

In this tutorial, you are going to learn how to set up Next.js with TypeScript and TailwindCSS. Firstly, we are going to add TypeScript, and afterward TailwindCSS. The purpose of the tutorial is to help you set up a project with these three technologies.
Once you complete the tutorial, you have a functional Next.js application with TypeScript and TailwindCSS. You can build on it and create a useful application!
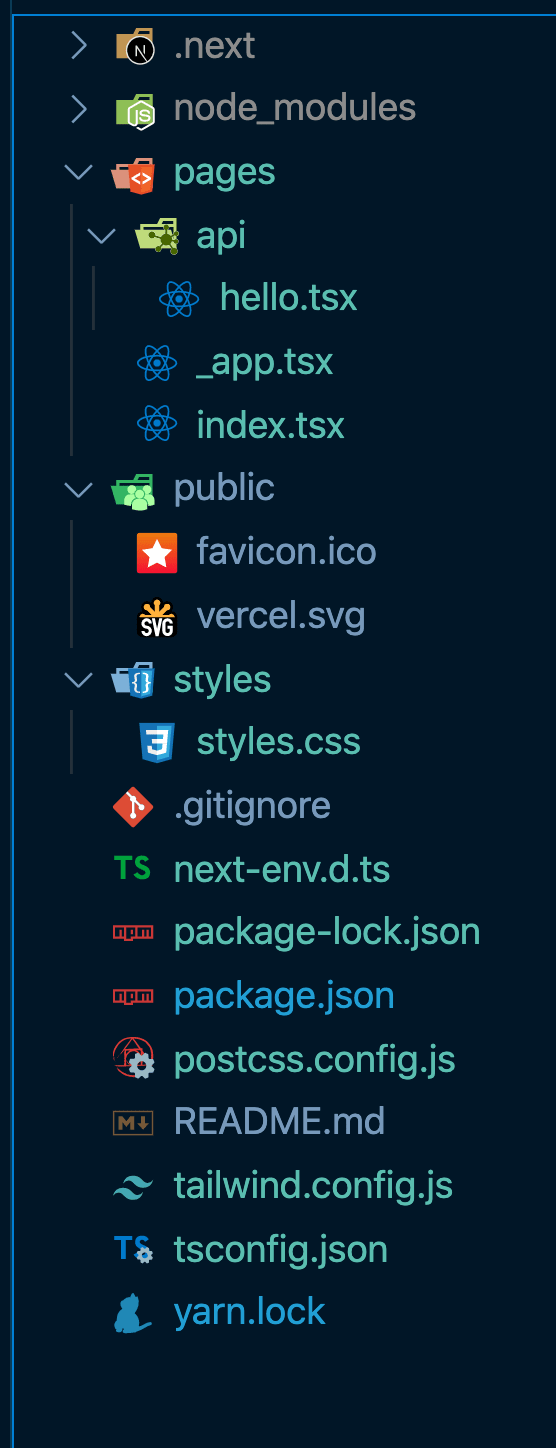
Whenever you feel confused about where to add files or what the project's structure should be, check the end of the article; there is an image with the final project.
Pre-requisites:
- Terminal knowledge.
- Knowing how to use a code editor.
- Basic npm/npx/yarn knowledge.
Create Next.js application
The first step is to create a simple Next.js application. We can do that by running the command below:
The command create-next-app is maintained by Next.js creators, and it builds an application within seconds — the folder named nextjs-typescript-tailwind stores your newly created application.
Now you can go into the application folder and run it. You can do so by following the commands below:
The cd command takes you into the specified folder, and yarn dev runs the application. You can go to localhost:3000 and see your new app. That is all you have to do to create a simple Next.js app.
Add TypeScript
The next step is to add TypeScript to our application. The first step you have to do is create the file tsconfig.json in the root directory. You can create the file by running the following command in the terminal:
The touch command allows you to create empty files in the Unix-based systems, such as Linux and macOS - read more about the touch command. Since our tsconfig file is empty, if you try to run the app, you get the following error:
It looks like you're trying to use TypeScript but do not have the required package(s) installed.
Please install typescript, @types/react, and @types/node by running:
yarn add --dev typescript @types/react @types/node
Since we are using npm in this tutorial, use the following command to install TypeScript in the project:
However, what does the above command do? It creates a file called next-env.d.ts, and it populates tsconfig.json. The purpose of tsconfig.json is to indicate that the directory present is the root of a TypeScript project. Also, it specifies the compiler information that is required to compile the project. Additionally, the next-env.d.ts file tells the TypeScript compiler to pick up the Next.js types.
Next.js types - that brings us to the next question; what are Next.js types? There are the GetStaticProps, GetStaticPaths, and GetServerSideProps types, which you can use for the methods getStaticProps, getStaticPaths, and getServerSideProps. For more types and information, check the Next.js documentation.
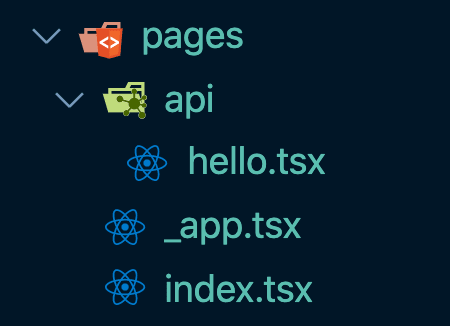
You are almost done now. The only step left is to change the .js extensions to .tsx. The .tsx extension is the extension of TypeScript JSX. After changing the extensions, your files should look like in figure 1:

Now your Next.js app fully supports TypeScript. From now on, you can write TypeScript code!
Add TailwindCSS
The next and last step is to add TailwindCSS to the application. To add Tailwind, you need to run the command below, which installs it in the app:
However, looking at the above line, you can see that we are not installing only Tailwind. We also have postcss-present-env. So what is that? According to their website, PostCSS "lets you convert modern CSS into something most browsers can understand, determining the polyfills you need based on your targeted browsers or runtime environments".
But why do we need it for Tailwind? The reason is that TailwindCSS is a PostCSS plugin. As a result, we need a tool to translate the modern CSS into something the browsers can understand.
Let's move further, and generate the tailwind.config.js file. The purpose of this file is to allow you to customize your TailwindCSS installation. It is a configuration file where you can add additional information such as plugins, themes, margins, padding, and everything you require and Tailwind does not have.
By running the above command, it automatically creates the tailwind.config.js file. If you want to add customizations, I recommend checking the TailwindCSS Configuration page.
The next step is to create a CSS file, where we can add the TailwindCSS data. Create a new file in the styles directory as follows:
You can add the CSS file wherever you want, and makes sense for your project. Also, you can name the CSS file "Tailwind.css" or however you want.
However, moving further, add the following lines to the styles.css file.
What these lines do is to hold all the CSS you can use in your app. At build time, it swaps these with the generated CSS. For instance, @tailwind base is the equivalent of Normalize.css.
PostCSS
We are almost done adding TailwindCSS to our project too. What is left is to set up the postcss.config.js file, which stores the configuration for PostCSS. As usual, we can create the file as follows:
After you create the configuration file for PostCSS, add the following code the it:
The last thing you have to do is add import '../styles/styles.css' at the beginning of the _app.tsx file. After doing so, you can use TailwindCSS everywhere in your application.
Conclusion
Well done! You added TypeScript and TailwindCSS to your Next.js application. At this point, your project should look similar to the one in figure 2 below.

You can find the project on my Github - click me.
Catalin publishes programming and software development articles on his blog.

.png)


