In this article, we learn how to use Pulumi and Debezium to create resilient event-driven architecture. We will use a modern technique called Change Data Capture.
In this article, we're going to see how to build fault-tolerant event-driven architectures. It's a complex topic that requires some devops experience but hang tight. It's definitely worth it. It will help you build resilient and scalable systems.
We're going to use a few tools and platforms to build this architecture:
- Google Cloud is our cloud provider, and we're going to deploy everything on top of it. It's my favorite cloud provider.
- Pulumi serves as our infrastructure as code tool.
- Debezium streams all the database changes to a message queue of our choice (Google Pub/Sub).
Event-driven architecture
Event-driven architecture is a system design concept that promotes using asynchronous events for the communication of services. That is opposed to direct synchronous communication of services (REST, gRPC, GraphQL, etc.). It has several advantages:
- Decoupling - The producer needs to be aware only of the message broker and doesn't care about the consumer of the events. There can be a single consumer or hundreds of them.
- Scalability - A decoupled system is much easier to scale as you can separate concerns to different services and process data faster.
- Resilience - Error in one service is less probably going to affect other services if you use events and async messages. As the services are not aware of each other. And in case of failure, you can apply a retry policy supported out-of-the-box by the message broker or even a dead letter policy.
Though it comes with a cost, you have to properly plan the event schema and be aware of it. Otherwise, your system might break. The event schema is just like a database schema or an API of service. You have to design it carefully.
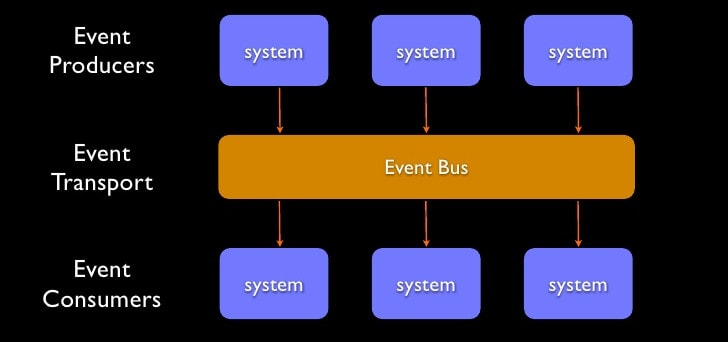
Credit to Stefan Norberg
Pulumi
Pulumi is an open-source solution for deploying infrastructure using code instead of running command lines or using YAML. It supports TypeScript (JavaScript as well), Python, Go, and C#. Terraform is a more popular tool for infrastructure as code, but I'm a Pulumi fan as I find writing code a much better solution than YAML.
Debezium
Debezium is an open-source platform that streams changes from a database to a message queue. It uses "Change Data Capture" (CDC), a modern technique implemented by the databases. CDC allows any system to subscribe to the changes in the database. Imagine triggers that can run anywhere and in any language. So Debezium uses CDC to publish these changes. It has wide support of connectors (Postgres, MySQL, Oracle, Cassandra, and more) and sinks (Kafka, Google Pub/Sub, Redis, and more).
What's in it for me?
You might wonder why I mumble around and dedicating the time to explaining all of this. So let me explain it with an example. Let's say we're building an application that when a new user is registered to the system, a welcome email is sent to them. A naive solution would be to call the mailer's API immediately after adding a new user to our database. It might work most of the time, but in some cases, it can also fail. And then what happens next? Should you delete the new user and return an error, or should you proceed? My point here is that you don't guarantee that sending the email is going to happen. And it's true for any endpoint with multiple actions. It can also be actions that are business-critical and may have a tremendous effect. Change data capture relies on the write-ahead log (WAL) to notify subscribers about any change in the data. The subscriber keeps an offset in this log that in case something bad happens, the subscriber can replay all the events it missed. It's a resilient and fault-tolerant mechanism. Whatever gets written to the database will find itself in the WAL. Back to our example, we can only add a new user to the system in our endpoint. We can subscribe to the change data capture stream and send the email when the system detects a new user was added. If the mailer is not available, we can keep retrying, and the user is not affected by it. Hopefully, I have managed to catch your interest. Let's see it in action.
Bootstrapping the project
To get started, we need to create a new Pulumi project, but first, we need to install it.
brew install pulumi

# Linux
curl -fsSL https://get.pulumi.com | sh

# Check that everything works
pulumi version
Next, let's create the project. We will use the TypeScript SDK. Navigate to your desired directory and run the below and follow the instructions:
pulumi new gcp-typescript
We also need the Kubernetes package because we're going to deploy Debezium there:
npm i @pulumi/kubernetes
Our project is ready, and we are good to go.
The plan
There's going to be a lot of Pulumi code in a second, but making it more clear, let's lay out the plan of what we're going to do:
- Deploy a Cloud SQL PostgreSQL instance
- Create a database user for our application and Debezium
- Create a Google Pub/Sub topic for the database changes
- Create a service account for Debezium so it can publish messages to the topic
- Deploy Debezium to Google Kubernetes Engine
Deploying Cloud SQL
Open your index.ts file. We're going to build it incrementally throughout this article.
import * as gcp from '@pulumi/gcp';
import * as pulumi from '@pulumi/pulumi';
import { all, Input, Output } from '@pulumi/pulumi';
import { readFile } from 'fs/promises';
import * as k8s from '@pulumi/kubernetes';
import { createHash } from 'crypto';

const name = 'debezium-demo';
const config = new pulumi.Config();

const cloudSqlInstance = new gcp.sql.DatabaseInstance('sql-instance', {
  name: `${name}-sql`,
  databaseVersion: 'POSTGRES_13',
  settings: {
    backupConfiguration: {
      enabled: true,
    },
    diskAutoresize: true,
    diskType: 'PD_SSD',
    tier: 'db-custom-1-3840',
    ipConfiguration: {
      privateNetwork: config.require('dbPrivateNetwork'),
    },
    maintenanceWindow: {
      day: 7,
      hour: 12,
    },
    databaseFlags: [{ name: 'cloudsql.logical_decoding', value: 'on' }],
  },
});

const database = new gcp.sql.Database('database', {
  name,
  instance: cloudSqlInstance.name,
});

const databasePass = config.require('dbPass');
const databaseUser = new gcp.sql.User(
  'database-user',
  {
    name,
    instance: cloudSqlInstance.name,
    password: databasePass,
  },
  { dependsOn: [database] },
);
So what's going on up there? First, we do some imports, some of them are not used just yet, but we will need them later. Next, we create the Cloud SQL instance and turn on the logical decoding flag to enable change data capture. We then create a new database in our instance, and lastly, we create a user for our application.
Before we can deploy everything, we need to set our configuration with our database password and network name and then apply the new changes.
pulumi config set dbPass 'pass' --secret
pulumi config set dbPrivateNetwork 'default' --secret
pulumi up
They're both saved encrypted so you can commit them to your git repo. Follow the interactive process to deploy everything. Once the database is up, we need to create a user manually for Debezium with the replication role. I haven't figure out how to automate it as part of the Pulumi pipeline, so open a connection to your Postgres instance and run the following:
create user debezium with replication in role cloudsqlsuperuser login password 'pass';
grant all privileges on database public.gatekeeper to debezium;
grant usage on schema public to debezium;
grant all privileges on all tables in schema public to debezium;
grant all privileges on all sequences in schema public to debezium;
Creating a service account
Debezium needs access to Google Pub/Sub to publish the messages. We need to create a service account and generate a new key that Debezium can use to connect. We'll create a few helper functions to make it a bit more easygoing, back to our index.ts file.
function serviceAccountToMember(
  serviceAccount:
    | gcp.serviceaccount.Account
    | Output<gcp.serviceaccount.Account>,
): Output<string> {
  return serviceAccount.email.apply((email) => `serviceAccount:${email}`);
}

type IAMRole = { name: string; role: string };

function addIAMRolesToServiceAccount(
  prefix: string,
  roles: IAMRole[],
  serviceAccount: gcp.serviceaccount.Account,
): gcp.projects.IAMMember[] {
  const member = serviceAccountToMember(serviceAccount);
  return roles.map(
    (role) =>
      new gcp.projects.IAMMember(`${prefix}-iam-${role.name}`, {
        role: role.role,
        member,
      }),
  );
}

function createServiceAccountAndGrantRoles(
  resourceName: string,
  baseName: string,
  serviceAccountId: string,
  roles: IAMRole[],
): {
  serviceAccount: gcp.serviceaccount.Account;
  iamMembers: gcp.projects.IAMMember[];
} {
  const serviceAccount = new gcp.serviceaccount.Account(resourceName, {
    accountId: serviceAccountId,
    displayName: serviceAccountId,
  });

  const iamMembers = addIAMRolesToServiceAccount(
    baseName,
    roles,
    serviceAccount,
  );

  return { serviceAccount, iamMembers };
}

const { serviceAccount: debeziumSa } = createServiceAccountAndGrantRoles(
  'debezium-sa',
  `${name}-debezium`,
  `${name}-debezium`,
  [
    { name: 'publisher', role: 'roles/pubsub.publisher' },
    { name: 'viewer', role: 'roles/pubsub.viewer' },
  ],
);

const namespace = 'debezium';

const debeziumKey = new gcp.serviceaccount.Key('debezium-sa-key', {
  serviceAccountId: debeziumSa.accountId,
});

const debeziumSecretSa = new k8s.core.v1.Secret('debezium-secret-sa', {
  metadata: {
    name: `${name}-debezium-sa`,
    namespace,
  },
  data: {
    'key.json': debeziumKey.privateKey,
  },
});
I don't want to go into all the nitty-gritty here, but we create a new service account and grant the necessary permissions. And at the end, we create a Kubernetes secret that keeps the private key to this service account that Debezium will later use. We use Kubernetes secret because everything is deployed to Kubernetes.
Generating a Debezium properties file
Every Debezium instance needs its configuration. In the configuration, we put all the details of the database connection and the relevant sink, in our case Google Pub/Sub. I tried to use environment variables to set the configuration, but I didn't manage to make it work, so I decided to use the application.properties file. Let's see how to generate it in Pulumi. Again, go to your index.ts file.
const debeziumTopicName = `${name}.changes`;
const debeziumTopic = new gcp.pubsub.Topic('debezium-topic', {
  name: debeziumTopicName,
});

const getDebeziumProps = (): Output<string> => {
  return all([cloudSqlInstance.privateIpAddress]).apply(async ([ip]) =>
    (await readFile('./application.properties', 'utf-8'))
      .replace('%database_pass%', config.require('debeziumDbPass'))
      .replace('%database_user%', config.require('debeziumDbUser'))
      .replace('%database_dbname%', name)
      .replace('%hostname%', ip)
      .replace('%topic%', debeziumTopicName),
  );
};

const debeziumPropsString = getDebeziumProps();
const propsHash = debeziumPropsString.apply((props) =>
  createHash('md5').update(props).digest('hex'),
);

const debeziumProps = new k8s.core.v1.Secret('debezium-props', {
  metadata: {
    name: `${name}-debezium-props`,
    namespace,
  },
  data: {
    'application.properties': debeziumPropsString,
  },
});
To make it work, we also need the application.properties template that I created. Feel free to adjust it to your needs.
debezium.source.connector.class=io.debezium.connector.postgresql.PostgresConnector
debezium.source.offset.storage.file.filename=data/offsets.dat
debezium.source.offset.flush.interval.ms=0
debezium.source.database.hostname=%hostname%
debezium.source.database.port=5432
debezium.source.database.user=%database_user%
debezium.source.database.password=%database_pass%
debezium.source.database.dbname=%database_dbname%
debezium.source.database.server.name=demo
debezium.source.table.include.list=public.mytable
debezium.source.plugin.name=pgoutput

debezium.transforms=Reroute
debezium.transforms.Reroute.type=io.debezium.transforms.ByLogicalTableRouter
debezium.transforms.Reroute.topic.regex=(.*)
debezium.transforms.Reroute.topic.replacement=%topic%

debezium.sink.type=pubsub
We use the above as a template and replace the placeholders in runtime. We create a secret from this properties string that we can, later on, mount to our Kubernetes deployment. In addition, we generate a hash of the properties string that we will use as a label to force deployment when only the properties change. In this part, we also create the Pub/Sub topic that Debezium will publish.
Deploying Debezium
And now for the final part. Let's deploy Debezium to our Kubernetes cluster. I assume you have a cluster running on your GCP project. Here's the code:
const labels: Input<{
  [key: string]: Input<string>;
}> = {
  parent: name,
  app: 'debezium',
};

const storageClass = new k8s.storage.v1.StorageClass('debezium-storage-class', {
  metadata: {
    name: 'retain-ssd',
    namespace,
  },
  provisioner: 'kubernetes.io/gce-pd',
  reclaimPolicy: 'Retain',
  parameters: {
    fstype: 'ext4',
    type: 'pd-ssd',
  },
});

new k8s.core.v1.PersistentVolumeClaim('debezium-pvc', {
  metadata: {
    name: `${name}-debezium-pvc`,
    namespace,
  },
  spec: {
    accessModes: ['ReadWriteOnce'],
    resources: { requests: { storage: '10Gi' } },
    storageClassName: storageClass.metadata.name,
  },
});

const limits: Input<{
  [key: string]: Input<string>;
}> = {
  cpu: '0.5',
  memory: '512Mi',
};

new k8s.apps.v1.Deployment(
  'debezium-deployment',
  {
    metadata: {
      name: `${name}-debezium`,
      namespace,
    },
    spec: {
      replicas: 1,
      selector: { matchLabels: labels },
      template: {
        metadata: {
          labels: { ...labels, props: propsHash },
        },
        spec: {
          volumes: [
            {
              name: 'service-account-key',
              secret: {
                secretName: debeziumSecretSa.metadata.name,
              },
            },
            {
              name: 'props',
              secret: {
                secretName: debeziumProps.metadata.name,
              },
            },
            {
              name: 'storage',
              persistentVolumeClaim: {
                // Must not depend on the PVC variable because it causes deadlock
                claimName: `${name}-debezium-pvc`,
              },
            },
          ],
          initContainers: [
            {
              name: 'data-ownership',
              image: 'alpine:3',
              command: ['chmod', '777', '/debezium/data'],
              volumeMounts: [{ name: 'storage', mountPath: '/debezium/data' }],
            },
          ],
          containers: [
            {
              name: 'debezium',
              image: 'debezium/server:1.5',
              ports: [{ name: 'http', containerPort: 8080, protocol: 'TCP' }],
              volumeMounts: [
                { name: 'props', mountPath: '/debezium/conf' },
                { name: 'storage', mountPath: '/debezium/data' },
                {
                  name: 'service-account-key',
                  mountPath: '/var/secrets/google',
                },
              ],
              env: [
                {
                  name: 'GOOGLE_APPLICATION_CREDENTIALS',
                  value: '/var/secrets/google/key.json',
                },
              ],
              resources: {
                limits,
                requests: limits,
              },
              livenessProbe: {
                httpGet: { path: '/q/health', port: 'http' },
                initialDelaySeconds: 60,
                periodSeconds: 30,
              },
            },
          ],
        },
      },
    },
  },
  { dependsOn: [debeziumTopic] },
);
Here, we create a persistent volume that Debezium will use to store the data. We choose an SSD volume for better performance. And then, we create a Kubernetes deployment with a single replica. We mount all the secrets to the right place, set the correct labels, liveness probe, and resources. It's important to highlight that we need to run an init container to set the right permissions on the persistent volume. I had problems with it in the past, and this is the best workaround I found. We need to set the new variables in the configuration and we then can deploy everything.
pulumi config set debeziumDbPass 'pass' --secret
pulumi config set debeziumDbUser 'debezium' --secret
pulumi up
Let's see some events
We have everything set up and ready to go. The only thing left to do is to create a test subscription for the Pub/Sub topic we created above. We will use this subscription to see the events Debezium publishes. Once the subscription is created, create a table in the database and add a new row. You can use the Google Cloud dashboard to see the messages in the subscription. You should have one message due to the insertion of the new row. You can see the complete format of the data change events in Debezium docs.
Conclusion
That was a lot! We learned how event-driven architecture can help us build resilient systems. And how Debezium is a key component in such systems. There's still a lot to learn. You can adjust Debezium properties to fit your applications, or even change the connector and sink. Also, it seems that the Debezium community is very active on Twitter. Do give it a shoot and let me know what you think.