
Language shouldn't be your barrier in getting to a billion users, so that's why I will demonstrate here how you can build a Next.js app to adapt to various languages. Read on.
Would you like your software/website to be used by only English-understanding users? I guess not, you will want your app to adapt to various languages. You don't want your users to be limited by a language. Language shouldn't be your barrier in getting to a billion users, so that's why I will demonstrate here how you can build a Nextjs app to adapt to various languages.
Internationalization
Internationalization, woah that's a 20-letter word. Too long to type, and much longer it will be when you have to repeat it various times in your text. That's why it is usually abbreviated to i18n :). So in most parts of this post, I will use i18n in place of Internationalization.
What is i18n?
According to Wikipedia, Internationalization is the process of designing a software application so that it can be adapted to various languages and regions without engineering changes. Developers build software application content in the language they understand. Chinese devs build apps that have Chinese content, English devs build apps that have English, likewise, it is for every language in the world. The application's content is in the language of the devs. For example, a news blog app built by Spanish developers will have its news content reeled out in the Spanish language.
These days i18n is one of the most popular features in software applications. Most modern softwares support the most popular languages you can find. Supporting i18n raises the bar high for you internationally because your app won't be only available for a particular region but the whole world. According to the Next.js official page: 72% of consumers are more likely to stay on your site if it’s been translated and 55% of consumers said they only buy from e-commerce sites in their native language.
Apps embodying i18n support multi-languages. It can support as many languages as it can. These i18n-enables apps can convert their content from one language to another language. The languages supported are often shown in a dropdown list for the user to select the language of choice. Most apps also do support i18n via domains. For e.g website, lit.com, can support its Spanish version in es.lit.com. That's another form of i18n.
A locale is a particular language supported in i18n-apps. The standard format for defining locales is the UTS Locale Identifiers, the general format for locales is language-region-script. For French in France, it is fr-FR. English in the US is en-US, English in Britain is en-EN.
In the next section, we will look at how we can build i18n-apps in Nextjs.
Internationalization and Next.js
Next.js is an open-source web framework for building server-side rendered web applications and statically generated web apps using React.js. Next.js has supported i18n since v10.0.0, it allows us to set the default language, the current language in use, and the supported languages. To set locales in a Next.js app we first create a next.config.js file in the root of our app. This is where we define our locales:
module.exports = {
  i18n: {
    /**
     * Provide the locales you want to support in your application
     */
    locales: ["en-US", "fr-FR", "es-ES"],
    /**
     * This is the default locale you want to be used when visiting
     * a non-locale prefixed path.
     */
    defaultLocale: "en-US",
  },
};
The i18n tells Next.js that we want to activate/user i18n feature in our Next.js app. The locales array property is where we add the locale code of the locales we want to support. The defaultLocale holds the default locale code of the app, this is the locale that will be used when no locale is active. Next.js has two strategies in which it handles i18n in our app. The strategies are: Sub-path routing and Domain routing.
Sub-path routing
Sub-path routing strategy involves adding the locales as part of the URL paths without affecting the component when they render.
Let's say we have this pages/users.js and we have locales "en-US", "es-ES", "fr-FR", and "en-US" is the default locale.
Next.js will map the fr-FR and es-ES to the /users path:
- /fr-fr/users
- /es-es/users
See the locales is prefixed to the /users path. Both routes will point to pages/users.js. The default locale is not prefixed to the path. We can then access the locale information in the pages/users.js via the Next.js router. With the useRouter() hook we can get the currently active locale in locale, all the locales in locales, and the default locale in defaultLocale.
import { useRouter } from "next/router";

const { locale, locales, defaultLocale } = useRouter();
See we restructured locale, locales and defaultLocale from the useRouter(). We can then use the locale value to know the language version of our content we should render.
For statically generated pages or server-side rendered pages we can pass the locale information via the getServerSideProps or getStaticProps. The methods pass props to components from an object containing a props key they return. These getServerSideProps or getStaticProps methods accept a context parameter, this parameter is an object that contains locale, the current active locale, locales all locales in our app, and defaultLocale, the default locale. We then pass this context to the props object the methods return so that we can access it from our component's props:
export default function Users(props) {
  const { locale, locales, defaultLocale } = props;
  console.log(locale, locales, defaultLocale);

  return (
    <div>
      <span>Users Component</span>
    </div>
  );
}

export const getStaticProps = async (context) => {
  return {
    props: { context },
  };
};
So we can get the locale information from the router and from the getServerSideProps or getStaticProps methods. Let's demonstrate the usage of the two in the below sections.
via useRouter() hook
Scaffold a Next.js app:
yarn create next-app i18n-next

npx create-next-app i18n-next
Move into the directory: cd i18n-next and run yarn dev. We will create a news page that displays a list of news. The language of the news content will change depending on the locale passed to the URL path. So, we will have the news content in different languages. We will support English(default), French, and Espana(Spanish 😁). First thing first, we create the next.config.js in our root folder, and add the below configuration:
module.exports = {
  i18n: {
    /**
     * Provide the locales you want to support in your application
     */
    locales: ["en-US", "fr-FR", "es-ES"],
    /**
     * This is the default locale you want to be used when visiting
     * a non-locale prefixed path e.g. `/hello`
     */
    defaultLocale: "en-US",
  },
};
This activates i18n in our app. Let's create a news.js file in pages component and paste in the below code:
import Head from "next/head";
import Link from "next/link";
import { useRouter } from "next/router";
import styles from "../styles/Home.module.css";
import NewsCard from "./../components/newscard";

const newsContent = {
  "en-US": {
    title: "Your News",
    content: [
      {
        title:
          "Otter.ai’s new assistant can automatically transcribe your Zoom meetings",
        synopsis:
          "A.I.-powered voice transcription service Otter.ai wants to make it even easier for its business users to record their meetings. The company is today introducing a new feature, Otter Assistant, whic...",
        imageUrl: "",
      },
      // ...
    ],
  },
  "fr-FR": {
    title: "Vos nouvelles",
    content: [
      {
        title:
          "Le nouvel assistant d'Otter.ai peut transcrire automatiquement vos réunions Zoom",
        synopsis:
          "Le service de transcription vocale alimenté par A.I. Otter.ai veut rendre encore plus facile pour ses utilisateurs professionnels l'enregistrement de leurs réunions. La société présente aujourd'hui une nouvelle fonctionnalité, Otter Assistant, qui ...",
        imageUrl: "",
      },
      // ...
    ],
  },
  "es-ES": {
    title: "Tus noticias",
    content: [
      {
        title:
          "El nuevo asistente de Otter.ai puede transcribir automáticamente sus reuniones de Zoom",
        synopsis:
          "El servicio de transcripción de voz con tecnología de inteligencia artificial Otter.ai quiere facilitar aún más a sus usuarios comerciales la grabación de sus reuniones. La compañía presenta hoy una nueva función, Otter Assistant, que ...",
        imageUrl: "",
      },
      // ...
    ],
  },
};

export default function News(props) {
  const { locale, locales, defaultLocale, asPath } = useRouter();
  const { title, content } = newsContent[locale];
  return (
    <div className={styles.container}>
      <Head>
        <title>TV</title>
        <link rel="icon" href="/favicon.ico" />
      </Head>

      <main className={styles.main}>
        <div className={styles.breadcrumb}>
          <div
            style={{
              padding: "4px",
              marginRight: "4px",
            }}
          >
            <span>Current Language: </span>
            <span
              style={{
                borderRadius: "3px",
                backgroundColor: "blue",
                color: "white",
                padding: "2px",
              }}
            >
              {locale}
            </span>
          </div>
          <Link
            activeClassName={locale === "es-ES"}
            href={asPath}
            locale="es-ES"
          >
            es-ES
          </Link>

          <Link
            activeClassName={locale === "en-US"}
            href={asPath}
            locale="en-US"
          >
            en-US
          </Link>
          <Link
            activeClassName={locale === "fr-FR"}
            href={asPath}
            locale="fr-FR"
          >
            fr-FR
          </Link>
        </div>

        <div className={styles.newscontainer}>
          <div className={styles.yournewscasts}>
            <h3>{title}</h3>
          </div>

          <div>
            {content.map((newsItem, i) => (
              <NewsCard key={i} news={newsItem} />
            ))}
          </div>
        </div>
      </main>
    </div>
  );
}
See that we set our news content first. The newsContent object holds our news contents in French, Spanish, and English. It has "en-US", "es-ES" and "fr-FR" properties, they all have keys "title", and "content". The title is what we will display on top of the page, it will display "Your News", so each locale has its own language version of “Your News”. the content is an array that holds the actual news content of our page.
We will use the locale from the useRouter() hook to get the news content for the particular language. If the locale is fr-Fr, we will reference fr-FR from the newsContent object like this newsContent["fr-FR]. This is what we did in the News component. We called the useRouter() hook and destructured locale and asPath from it. Like we already know, locale holds the currently active locale. The asPath gives us the route with regards to the current locale. For e.g if the current locale is en-US then the asPath is /en-US/news.
Next down, we retrieve the particular language object from the newsContent object by doing this: newsContent[locale]. We destructured the title and content from it. Now, we render them on the UI. In the News component UI, we display the current locale:
<div
  style={
    {
      // ...
    }
  }
>
  <span>Current Language: </span>
  <span
    style={
      {
        //...
      }
    }
  >
    {locale}
  </span>
</div>
Next, we set up transition between locales:
<Link
    activeClassName={locale === "es-ES"}
    href={asPath}
    locale="es-ES"
>
    es-ES
</Link>

<Link
    activeClassName={locale === "en-US"}
    href={asPath}
    locale="en-US"
>
    en-US
</Link>
<Link
    activeClassName={locale === "fr-FR"}
    href={asPath}
    locale="fr-FR"
>
    fr-FR
</Link>
This will display links with text es-ES, en-US and fr-FR with href links to /en-US/news, /news and /fr-FR/news respectively. If you click on es-ES it will load the route es-ES/news, the current locale becomes es-ES and our component will load the news content for es-ES. So the above links serve to change the language of our app. Clicking on any of them will translate the content of the app to the clicked language. Last, the content array is displayed:
<div>
  {content.map((newsItem, i) => (
    <NewsCard key={i} news={newsItem} />
  ))}
</div>
The NewsCard component renders the news for each news item. Our app will look like this:
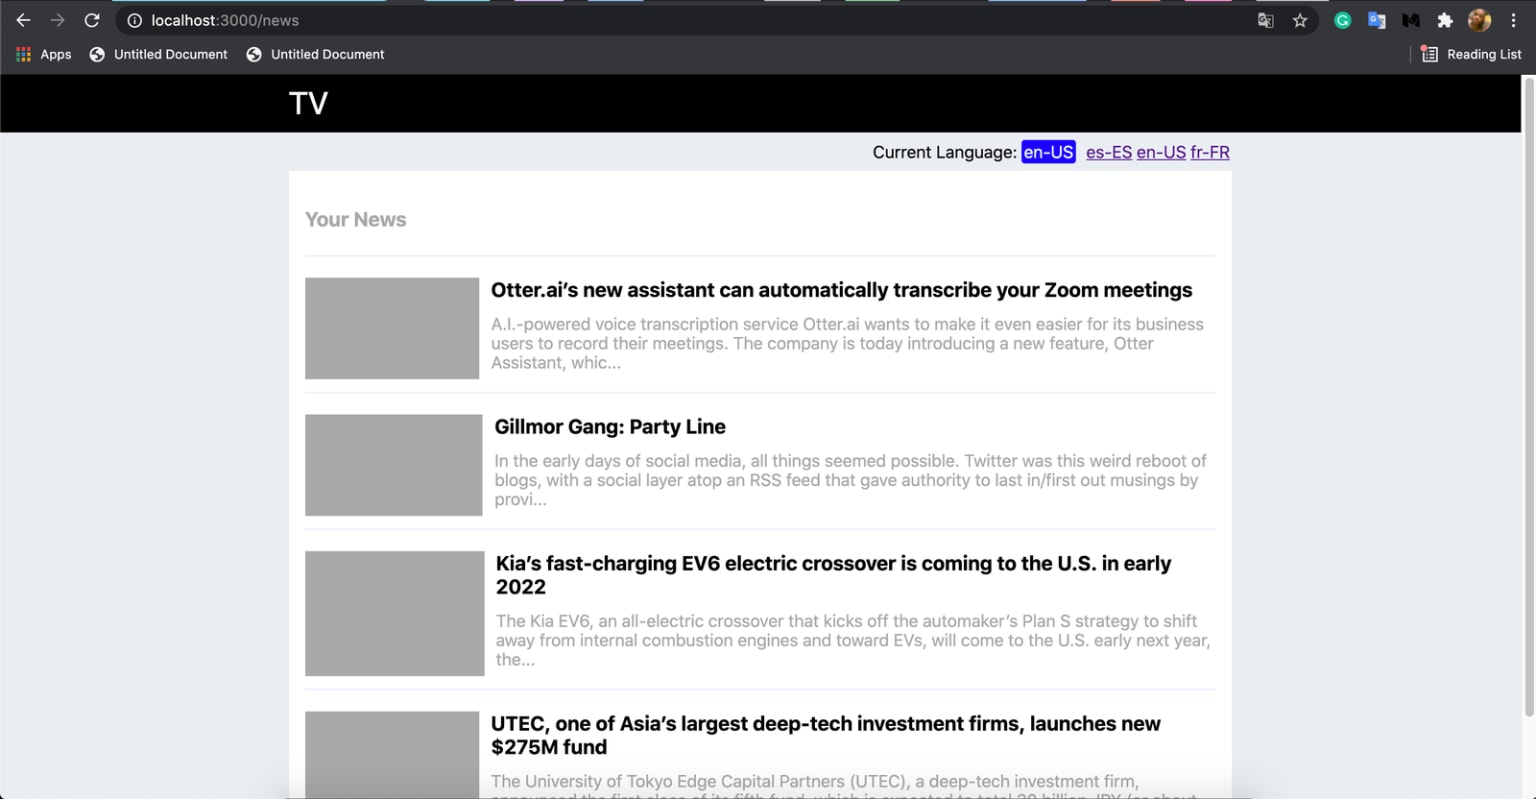
Our News site in English
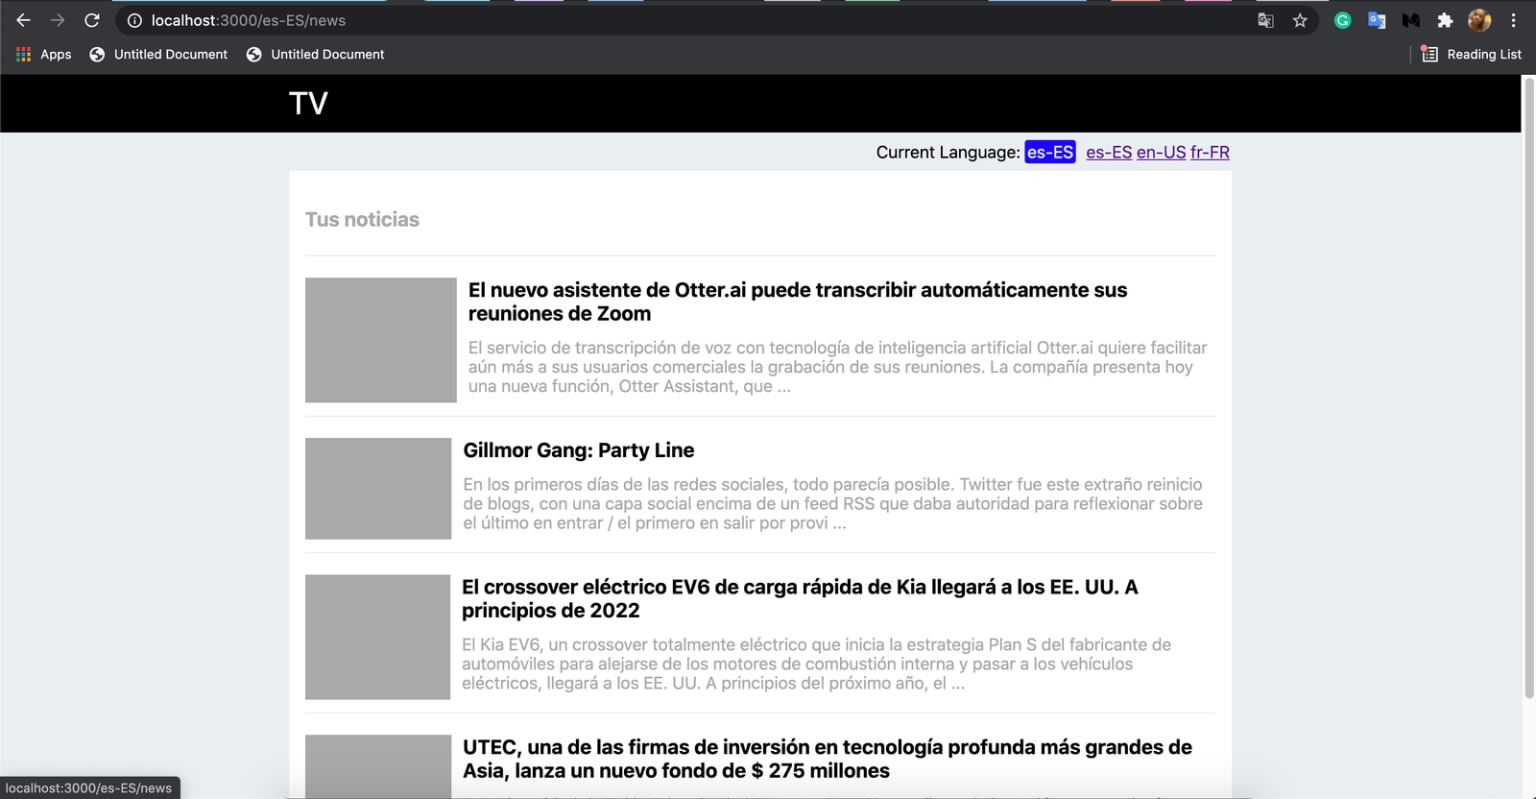
Our News site in Espana(Spanish)

Our News site in French
We clicked on the links to change the languages. If we decide to navigate our routes using the next/router programmatically:
const router = useRouter();

router.push("/news", "/news");
We will have to pass a locale option in an object in a third parameter, to navigate to a locale route:
const router = useRouter();

router.push("/news", "/news", { locale: "es-ES" });
This will load the /fr-FR/news route so the locale will be French.
via getServerSideProps or getStaticProps
Now we demonstrate i18n using either getServerSideProps or getStaticProps. It will be a minor edit in our News component:
// ...
export default function News(props) {
  const { locale, locales, defaultLocale } = props.context;
  const { title, content } = newsContent[locale];
  return (
    <div className={styles.container}>
      <Head>
        <title>TV</title>
        <link rel="icon" href="/favicon.ico" />
      </Head>

      <main className={styles.main}>
        <div className={styles.breadcrumb}>
          <div
            style={{
              padding: "4px",
              marginRight: "4px",
            }}
          >
            <span>Current Language: </span>
            <span
              style={{
                borderRadius: "3px",
                backgroundColor: "blue",
                color: "white",
                padding: "2px",
              }}
            >
              {locale}
            </span>
          </div>
          <Link
            activeClassName={locale === "es-ES"}
            href={`/es-ES/news`}
            locale="es-ES"
          >
            es-ES
          </Link>

          <Link
            activeClassName={locale === "en-US"}
            href={`/en-US/news`}
            locale="en-US"
          >
            en-US
          </Link>
          <Link
            activeClassName={locale === "fr-FR"}
            href={`/fr-FR/news`}
            locale="fr-FR"
          >
            fr-FR
          </Link>
        </div>

        <div className={styles.newscontainer}>
          <div className={styles.yournewscasts}>
            <h3>{title}</h3>
          </div>

          <div>
            {content.map((newsItem, i) => (
              <NewsCard key={i} news={newsItem} />
            ))}
          </div>
        </div>
      </main>
    </div>
  );
}

export async function getStaticProps(context) {
  return {
    props: {
      context,
    },
  };
}
We exported a getStaticProps method from the news.js file, this will make the News component to be statically generated at build time. If we had used getServerSideProps instead of getStaticProps, the page will be generated from the server.
The main thing here is that we pass the context argument to the props object and return the object from the getStaticProps method. Now, we can access the context in the News component via its props argument; props.context. Then we destructure the locale from it. Every other thing stands, we just had to refactor our transition links because the pros.context won't have the asPath so we set them manually.
We can do this programmatically in an efficient way, I leave it to the reader to make the above better. 😁 So our app runs the same as when we used useRouter().
Domain routing
Domain routing strategy involves mapping the locales to a top-level domain. For example, we have our locales set:
module.exports = {
  i18n: {
    locales: ["en-US", "fr-FR", "es-ES"],
    defaultLocale: "en-US",
  },
};
We can set the locales to be served based on domains.
module.exports = {
  i18n: {
    locales: ["en-US", "fr-FR", "es-ES"],
    defaultLocale: "en-US",
    domains: [
      {
        domain: "mynews.com",
        defaultLocale: "en-US",
      },
      {
        domain: "mynews.es",
        defaultLocale: "es-ES",
      },
      {
        domain: "mynews.fr",
        defaultLocale: "fr-FR",
      },
    ],
  },
};
Next.js will create locale URL paths based on the domains we set in the domains array property above. Now, the French version of our site mynews.com/news will be mynews.fr/news. The Spanish version will be mynews.es/news.
Other i18n implementations
There are good libraries that brings i18n to Next.js and also makes it very it easy to use. Check them out below:
Conclusion
Next.js made i18n very easy and simple. Al you have to do is set your locales in a next.config.js file and your multi-language data and you are good to go. You only have to get the locale information from useRouter() hook or via getStaticProps or getServerSideProps methods.
Source code
See the full code here