
RedwoodJS is a full-stack serverless web application framework built by Tom Preston Werner (co-founder of GitHub) et al. This framework provides the mechanism to build JAMstack applications very fast. Such applications can be deployed with ease just with a git push command.
What is RedwoodJS?
RedwoodJS is a full-stack serverless web application framework built by Tom Preston Werner (co-founder of Github) et al. This framework provides the mechanism to build JAMstack applications very fast. Such applications can be deployed with ease just with a git push command.
Being a full-stack framework means that the frontend code and backend code are all maintained in the same RedwoodJS project. The frontend is a React application while the backend is a GraphQL server. RedwoodJS follows best practices in folder structures, it has pre-defined places where codes are kept. In the below sections we will first learn how to scaffold a RedwoodJS project and we will go through the features in a RedwoodJS project.
Scaffolding a RedwoodJS app
To create a RedwoodJS project we will run the command below:
yarn create redwood-app redwoodprj

npx create-redwood-app redwoodprj
The above command will scaffold a RedwoodJS project in redwoodprj folder.
Now move into the redwoodprj folder, cd redwoodprj, and run the server:
yarn rw dev
Redwood will automatically open the http://localhost:8910/ in your browser, if that does not happen open your browser and navigate to http://localhost:8910/.
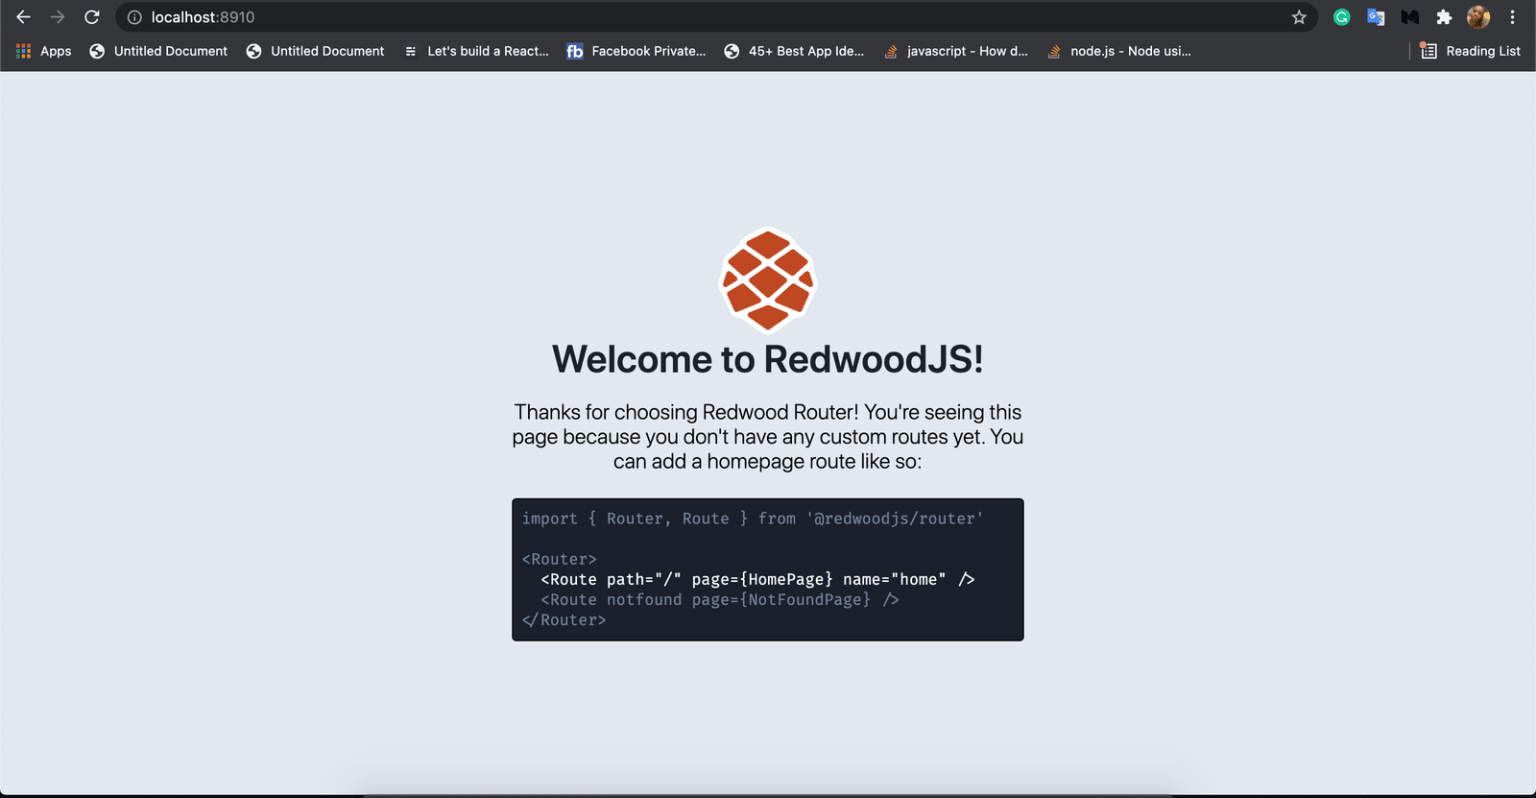
RedwoodJS initial page
Let's see the folder structure in our redwoodprj project:
redwoodprj
│
├── api
│   ├── db
│   │   ├── schema.prisma
│   │   └── seed.js
│   └── src
│       ├── functions
│       │   └── graphql.js
│       ├── graphql
│       ├── lib
│       │   └── db.js
│       └── services
└── web
    ├── public
    │   ├── README.md
    │   ├── favicon.png
    │   └── robots.txt
    └── src
        ├── Routes.js
        ├── components
        ├── index.css
        ├── index.html
        ├── App.js
        ├── layouts
        └── pages
            ├── FatalErrorPage
            │   └── FatalErrorPage.js
            └── NotFoundPage
                └── NotFoundPage.js
A Redwood project is a monorepo. It contains two node projects, web and api. These are two separate projects residing in the monorepo. The web side will run on the browser, it is the frontend part of the application; while the api will run on the server, it hosts the APIs of the application.
The api is a GraphQL API, it contains backend serverless functions that can run in Amazon Serverless Lambda Functions. The main logic or code in this api is written in what is called services. Each service represents an API endpoint that can be called from the same Redwood frontend or external services.
The web is a React application. It has Page components that maps to different URL paths, a Router for its routing system, "Cell" (a RedwoodJS-generated component that fetches data, it is the middle-man between our frontend and our backend.) and regular React components. This web side can communicate with the api side to fetch and display data. This web side also can be deployed and server from a CDN.
Analysing a RedwoodJS folder
We will begin from the api side, then we move to the web side, and finally to the other files and folders in the monorepo.
api This folder houses the APIs or the server of our project. It is a Node.js project. With Yarn, we can add packages to this folder by using the workspace sub-command.
cd api
yarn workspace add fs
Yarn refers to Node projects in a monorepo as workspaces. That's why we used the workspace sub-command to tell Yarn that this is a Node project in a parent project.
db This folder contains the database configuration. RedwoodJS uses the Prisma tool for database connection and interaction.
What is Prisma? Prisma is an ORM tool based on JavaScript and TypeScript used for data modeling, database connection, and database migrations. It lets us connect and send commands to an SQL database using JavaScript methods.
schema.prisma This is the Prisma schema where your data models are defined. These models represent the tables and columns in your database.
For example, let's say your schema.prisma file has the below model.
model UserExample {
  id    Int     @id @default(autoincrement())
  email String  @unique
  name  String?
}
This will translate to your db as a userexample table with the columns id, email, and name.
Now, migrations files are created from these models and applied to your DB. Migrations in RedwoodJS are run by running the below command:
yarn redwood prisma migrate dev
This command will create and apply the migrations.
What is migration?
Migration is the process of mapping the models in a schema file to a database. In our case here, the UserExample model will have a corresponding table UserExample in our database, and the table will have columns. So model maps to tables in a database, and the fields of the model map to the table's columns. The mapping process is done by first generating SQL commands from the schema file. For example, our UserExample model will have to SQL generated for it:
CREATE TABLE "userexample" (
    "id" INTEGER NOT NULL PRIMARY KEY AUTOINCREMENT,
    "name" TEXT,
    "email" TEXT NOT NULL,
);
This command SQL will be in the migrations.sql, this file will then be executed in an SQL engine. For each addition or deletion or modification to the models in the schema, SQL queries/commands are generated from the modification, and the SQL queries are run to replicate the modification to the db. Looking at the contents in the schema.prisma file:
datasource db {
  provider = "sqlite"
  url      = env("DATABASE_URL")
}

generator client {
  provider      = "prisma-client-js"
  binaryTargets = "native"
}

// Define your own datamodels here and run `yarn redwood prisma migrate dev`
// to create migrations for them and apply to your dev DB.
// TODO: Please remove the following example:
model UserExample {
  id    Int     @id @default(autoincrement())
  email String  @unique
  name  String?
}
Apart from the model object, we have other objects. These objects have special purposes. The datasource db object holds configuration to our database. The provider is the Prisma connector. Connector is a JavaScript file which hosts functions and methods on how to connect and manipulate a database. Here, the provider is sqilte which tells Prism to use its SQLite connector. The url is the URL connection to the database server, the DATABASE_URL is an environment variable held in the .env file.
The generator client holds a configuration for generating assets from the schema. The provider specifies the language generator to use in running the query, migration, introspection engines. Here, it is set to prisma-client-js. The binaryTargets is the operating system the Prisma will generate assets for, here it is set to native. This implies that Prisma should detect the current OS and specify the current binary target for it.
Let's move to the next file which is seed.js.
seed.js This file is where we write code in JavaScript to seed our database with mock data.
Sometimes we need some data in our database for our app to run or we want to test the data in our database without going through to app UI to seed some data, this file seed.js comes to our aid.
Let's look at the contents:
/* eslint-disable no-console */
const { PrismaClient } = require("@prisma/client");
const dotenv = require("dotenv");

dotenv.config();
const db = new PrismaClient();

async function main() {
  console.warn("Please define your seed data.");
}

main()
  .catch((e) => console.error(e))
  .finally(async () => {
    await db.$disconnect();
  });
See the db variable, it is a PrismaClient instance. The PrismaClient is imported from the Prisma library, it contains methods that are used to perform CRUD actions on our database. The db will contains objects of all the models in our schema file, these objects will have functions/methods like create, find, update, etc. These methods are what we call to perform a create/read/update/delete action on the table.
The main function is where our seed code is written. The data we want to seed must match our data model and its seeding needs.
To run this file, we have to run the below command:
yarn redwood db seed
This command will execute the seed.js file, seeding our database with mock data.
src This is where our backend code is stored.
functions This folder houses your lambda functions, currently, it has an auto-generated file grahpql.js.
graphql.js This file is created by RedwoodJS, this is where the services and schemas are merged.
graphql This folder holds your GraphQL schemas. The schema files end in .sdl.js.
lib This folder houses utility stuffs like authentication, logger, and other things.
auth.js This file is where we add authentication to our application.
logger.js This place is where we extend and override the default login options in RedwoodJS. We can make the logging stream to be to a file, terminal, or any other place.
db.js This file exports the instance of PrismaClient as db.
services This is where the code, all the queries, and mutation resolver functions are contained.
Let's move over to the frontend folder, web.
web This contains our frontend code.
web/src/components This is where reusable React components in our application are kept.
web/src/layout This is where the layouts are housed.
web/src/pages This folder houses the page components in our application. Pages components are React components that are attached to a URL path. When a URL path is navigated in the browser, the corresponding file path in the pages folder is located and the component there is rendered on the browser.
web/src/pages/FatalErrorPage/FatalErrorPage.js
This page is loaded when an error occurs when fetching a page. The React component in this file is rendered on the browser to tell users about the error.
web/src/pages/NotFoundPage/NotFoundPage.js This page is loaded when the route navigated is non-existent in the application. The React component in this file is rendered on the browser telling the user about the error.
App.js This is the entry point of our front-end application. The App component in this file is the root component of our entire application. Any component rendered here will appear on all pages. This is where data and providers(lang, theme, etc) that we want to propagate down to all components are rendered.
Routes.js This file is where the routes in our application are defined.
With a simple photo from the RedwoodJS docs, let's see how a RedwoodJS app works in nutshell.
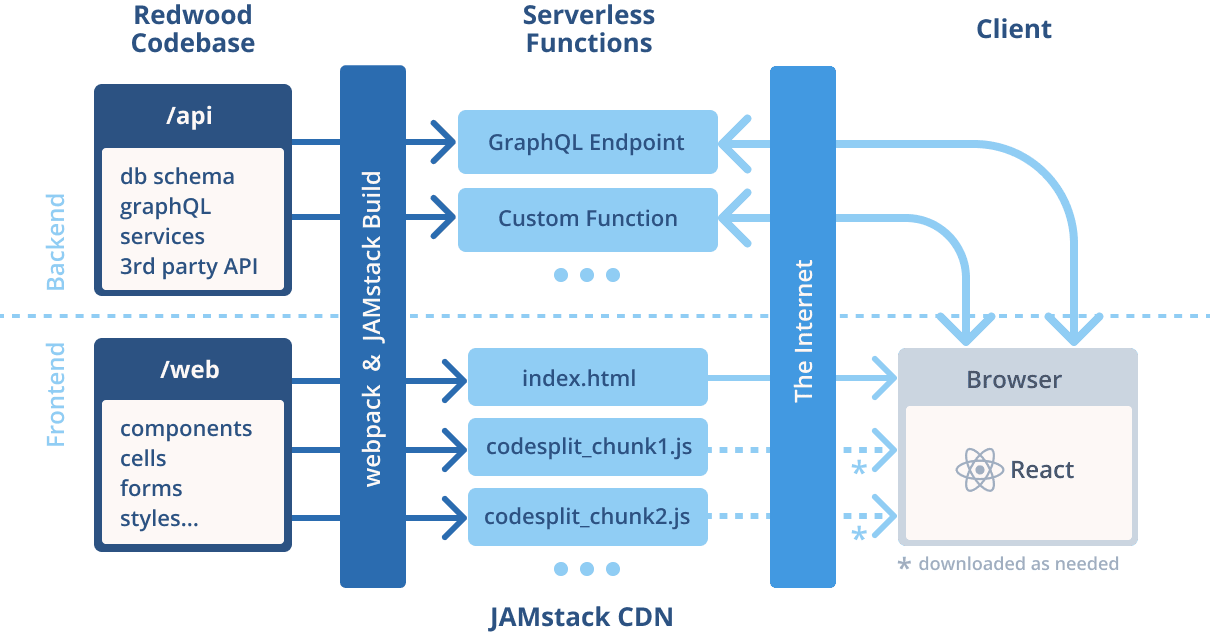
Overview of how a RedwoodJS app works
The web components and pages are code-split and loaded in the browser on demand. The api is hosted on another server or the same server as the web. The web makes an HTTP request to the GraphQL endpoints in api, the endpoints respond and sends back a response to the web.
Routing in RedwoodJS
RedwoodJS has a powerful Routing system. It works just like React-Router.
The Router component encompasses the routes in the application. The Route is where the URL paths and the components to render are set.
Example:
const Routes = () => {
  return (
    <Router>
      <Route path="/news" page={NewsPage} />
      <Route path="/blogs" page={BlogPage} />
    </Router>
  );
};
The path is used to map the URL path to the component. If the URL path news is loaded in the browser, the React component NewsPage is loaded int= the browser.
The page tells the Router the component to render for a URL path.
Redwoojs just like Nextjs and Blitz has the useParam hook, which we can use to extract parameters from a URL path.
This is the same thing as is done by React-Router, if you fully understood Routing in React-Router then, this is no different.
Services
Services are GraphQL resolvers in RedwoodJS. Like we have learned, services are kept in the api/services folder this is done so that all our GraphQL logic will be in one place.
These services are implementations of GraphQL schema in our application.
A service has its GraphQL definition in sdl.js file:
// api/src/graphql/todos.sdl.js
export const schema = gql`
  type Todo {
    id: Int!
    name: String
    done: Boolean!
  }

  type Query {
    todos: [Todo!]!
  }

  input CreateTodoInput {
    name: String
    done: Boolean!
  }

  input UpdateTodoInput {
    name: String
    done: Boolean
  }
`;
The resolver function is then defined:
// api/src/services/todos/todos.js
import { db } from "src/lib/db";
import { requireAuth } from "src/lib/auth";

// Used when the environment variable REDWOOD_SECURE_SERVICES=1
export const beforeResolver = (rules) => {
  rules.add(requireAuth);
};

export const todos = () => {
  return db.todo.findMany();
};
Very simple, RedwoodJS does the code generation for us.
Fetching data using Cells
A Cell is a minimal component that RedwoodJS generates that does the job of fetching data for us. When fetching data in a component to render, there are conditions we need to handle. Initially, when the HTTP request is being made we need to display a visual cue telling the users that something is happening in the background. We need to display a loading effect. Another state to handle is the success, when the data is successfully fetched we need to display the data. The next state is the empty, if there is no data fetched we need to tell the users that in the UI instead of displaying a blank page. The last state is failure, if an error occurs when fetching the data there should be a visual cue telling the user about the error and an option to retry.
A Cell in RedwoodJS encapsulates all these states, let's see an example below:
export const QUERY = gql`
  query FindTodoQuery($id: Int!) {
    todo: todo(id: $id) {
      id
    }
  }
`;

export const Loading = () => <div>Loading...</div>;

export const Empty = () => <div>Empty</div>;

export const Failure = ({ error }) => (
  <div style={{ color: "red" }}>Error: {error.message}</div>
);

export const Success = ({ todo }) => {
  return <div>{JSON.stringify(todo)}</div>;
};
You see the states, success, failure, empty, and loading. See that there is a FindTodoQuery, it calls and returns a single todo.
Commands
Let's see some basic commands of RedwoodJS CLI:
- yarn rw g cell This generates a Cell component.
- yarn rw g page This command generates a page component.
- yarn rw prisma migrate dev This command runs migrations on our application.
- yarn rw g sdl This command generates a GraphQL schema definition file.
- yarn rw g service This command generates the service files.
- yarn rw dev This command runs the Redwood dev server. The Redwood application is a server on http://localhost:8910/.
Build a todo app
We need to demonstrate how to use RedwoodJS to build an app. The app will be a simple app, it will be able to:
- Display todos.
- Create a todo.
- View a todo item.
- Edit a todo item.
- Delete a todo item.
We already have a RedwoodJS project scaffolded in redwoodprj. So move into this directory if you have not yet: cd redwooodprj.
Add Todo model
We will add our Todo model in the schema.prisma file.
model Todo {
  id    Int     @id @default(autoincrement())
  name  String?
  done Boolean
}
Now, run the command to create and apply migrations on our db: yarn rw prisma migrate dev. The command will prompt for the name of the migrations type in added_todo and hit Enter. Redwood will create and run the migrations.
Create services
Now, we create services that will use to carry out CRUD operations on our todo table in the db. Run this command:
yarn rw g service todo
This command will create the files:
api/src/graphql/todos.sdl.js: This file contains the GraphQL schema definitions of our GraphQL endpoints.
api/src/services/todos/todos.js: This is our service file. All our query and mutation resolver functions are kept here.
The GraphQL schema given to us is minimal:
export const schema = gql`
  type Todo {
    id: Int!
    name: String
    done: Boolean!
  }

  type Query {
    todos: [Todo!]!
  }

  input CreateTodoInput {
    name: String
    done: Boolean!
  }

  input UpdateTodoInput {
    id: Int!
    name: String
    done: Boolean
  }
`;
We need to add more GraphQL schema. We need schemas for getting a todo item, mutations for creating, updating, and deleting a todo, and an input type for delete input.
export const schema = gql`
  type Todo {
    id: Int!
    name: String
    done: Boolean!
  }

  type Query {
    todos: [Todo!]!
    todo(id: Int!): Todo
  }

  type Mutation {
    createTodo(request: CreateTodoInput): Todo
    updateTodo(request: UpdateTodoInput): Todo
    deleteTodo(request: DeleteTodoInput): Todo
  }

  input CreateTodoInput {
    name: String
    done: Boolean!
  }

  input UpdateTodoInput {
    id: Int!
    name: String
    done: Boolean
  }

  input DeleteTodoInput {
    id: Int!
  }
`;
Also, we need to flesh out the resolvers in the services/todos/todos.js file:
import { db } from "src/lib/db";
import { requireAuth } from "src/lib/auth";

export const todos = () => {
  return db.todo.findMany();
};

export const todo = ({ id }) => {
  return db.todo.findFirst({ where: { id } });
};

export const createTodo = ({ request }) => {
  return db.todo.create({
    data: request,
  });
};

export const updateTodo = ({ request }) => {
  return db.todo.update({
    where: {
      id: request?.id,
    },
    data: {
      name: request?.name,
      done: request?.done,
    },
  });
};

export const deleteTodo = ({ request }) => {
  return db.todo.delete({ where: { id } });
};
The todo function runs when a todo query is executed. The id arg is destructured from the argument and then the specific todo item is fetched from the db using the db.todo.findFirst({ where: { id } }) method. The createTodo function is called when the mutation createTodo is executed. The request contains the details of the todo to create. The create method is called on the db.todo object to create the todo on the todo table. The updateTodo function is called when the mutation updateTodo is executed. The update method is called on db.todo to update the todo item with id. The deleteTodo function is called when the mutation deleteTodo is executed. The delete method on db.todo is called to remove the todo item with id from the todo table. We are done with our backend and APIs let's move over to the frontend.
Create the pages
Our app will have two pages, TodoPage, and ViewTodoPage. TodoPage will display all the todos in the system, and the ViewTodoPage will display a specific todo item.
Let's create them:
yarn rw g page todo /todos
yarn rw g page viewTodo /todo/{id}
The first command creates the todo page, the main page file is here web/src/pages/TodoPage/TodoPage.js. The page will map to the URL path /todos.
The second command will create the view todo page. It is a dynamic route, so it will map to /todo/{id}, the id will be the unique identifier of a todo item in the database.
Our Routes.js will have the code:
import { Router, Route } from "@redwoodjs/router";

const Routes = () => {
  return (
    <Router>
      <Route path="/todo/{id}" page={ViewTodoPage} name="viewTodo" />
      <Route path="/todos" page={TodoPage} name="todo" />
      <Route notfound page={NotFoundPage} />
    </Router>
  );
};

export default Routes;
See that all the pages we generated are here. Each page has its Route component, with its URL path and the page component it maps to. All the page component's Routes are set here. We don't need to bother since they are imported here by RedwoodJS automatically when we use the generate page command. If you create your page components manually, then you have to import your page component here.
Let's start with the TodoPage.
TodoPage This page will fetch all the todos in the db and display them. We will use RedwoodJS Cell component here to help in fetching the todos and also in rendering and managing the states.
So we create a TodosCell: yarn rw g cell todos. It will generate files in the components folder. The main file is web/src/components/TodosCell/TodosCell.js.
TodosCell
We modify the code to this:
import TodoCard from "src/components/TodoCard";

export const QUERY = gql`
  query TodosQuery {
    todos {
      id
      name
      done
    }
  }
`;

export const Loading = () => <div>Loading...</div>;

export const Empty = () => <div>Empty</div>;

export const Failure = ({ error }) => (
  <div style={{ color: "red" }}>Error: {error.message}</div>
);

export const Success = ({ todos }) => {
  return (
    <div>
      {todos.map((item) => {
        return <TodoCard todo={item} key={item.id} />;
      })}
    </div>
  );
};
The QUERY is used to get all the todos in the system. We see all the states. The Success component was only touched so we render the todos in a TodoCard component.
TodoCard
Now, let's scaffold the TodoCard component:
yarn rw g component TodoCard
It creates a TodoCard component in the components folder. Make its code in web/src/components/TodoCard/TodoCard.js to look like this:
import { Link, routes } from "@redwoodjs/router";

function randColors() {
  const colors = ["red", "purple", "blue", "green", "yellow"];
  return colors[Math.floor(Math.random() * colors.length)];
}

const TodoCard = ({ todo }) => {
  return (
    <Link to={routes.viewTodo({ id: todo?.id })}>
      <div
        style={{
          borderLeft: `2px solid ${randColors()}`,
          borderRadius: "3px",
          padding: "10px",
          margin: "3px",
          marginTop: "15px",
          cursor: "pointer",
        }}
      >
        <span
          style={{
            display: "block",
            margin: "4px",
            marginBottom: "4px",
            paddingBottom: "10px",
          }}
        >
          What to do: <b>{todo?.name}</b>
        </span>
        <span style={{ display: "block" }}>
          <span>Status</span>:
          <span
            style={{
              backgroundColor: `${todo?.done ? "blue" : "red"}`,
              color: "white",
              padding: "4px",
              borderRadius: "10px",
            }}
          >
            {todo?.done ? "Completed" : "In-complete"}
          </span>
        </span>
      </div>
    </Link>
  );
};

export default TodoCard;
This just gets the todo object via its props, and then renders its details on the UI.
Let's go back to the TodoPage component and paste the below code:
import styles from "./../../Home.module.css";
import TodosCells from "src/components/TodosCell";
import { useState } from "react";
import AddTodo from "src/components/AddTodo";

const TodoPage = () => {
  const [showAddTodo, setShowAddTodo] = useState(false);
  return (
    <div className={styles.container}>
      <head>
        <title>Todo app</title>
        <link rel="icon" href="/favicon.ico" />
      </head>

      <main className={styles.main}>
        <div className={styles.breadcrumb}>
          <div>
            <span style={{ margin: "1px" }}>
              <button onClick={() => setShowAddTodo(true)}>Add Todo</button>
            </span>
          </div>
        </div>

        <div className={styles.accountcontainer}>
          <div className={styles.youraccounts}>
            <h3>Todos</h3>
          </div>
          <div>
            <TodosCells />
          </div>
        </div>
        {showAddTodo ? (
          <AddTodo closeModal={() => setShowAddTodo(false)} />
        ) : null}
      </main>
    </div>
  );
};

export default TodoPage;
See that there is no code to fetch the todos here. The TodoCells we rendered does it for us and the todo list is displayed when this page is loaded on the browser.
See that we have a button Add Todo that when clicked it displays a AddTodo component. This AddTodo component is a modal with UI where new todo details are typed and created. We will come to this component later.
ViewPage
Now, let's see the ViewTodoPage
import TodoCell from "src/components/TodoCell";

const ViewTodoPage = ({ id }) => {
  return <TodoCell id={id} />;
};

export default ViewTodoPage;
The id of the todo item is passed to it in its props via id. We see a Cell component TodoCell that is passed the id. This Cell component will fetch the todo via its id and display them.
TodoCell
Let's create the TodoCell component:
yarn rw g cell todo
We modified the code it generated to below:
import ViewTodo from "src/components/ViewTodo";

export const beforeQuery = ({ id }) => ({
  variables: { id: parseInt(id) },
});

export const QUERY = gql`
  query FindTodoQuery($id: Int!) {
    todo: todo(id: $id) {
      id
      name
      done
    }
  }
`;

export const Loading = () => <div>Loading...</div>;

export const Empty = () => <div>Empty</div>;

export const Failure = ({ error }) => (
  <div style={{ color: "red" }}>Error: {error.message}</div>
);

export const Success = ({ todo }) => {
  return <ViewTodo todo={todo} />;
};
See the beforeQuery function, this function is called before the query is made to our API. The function sets the variable of the query with the id of the todo to fetch.
The QUERY is the query string used to fetch the todo.
The Success component displays the fetched todo in a ViewTodo component. The ViewTodo is a component so we generate it yarn rw component ViewTodo.
ViewTodo
The code is this:
import { useState } from "react";
import styles from "./../../Home.module.css";
import { useMutation } from "@redwoodjs/web";
import EditTodo from "src/components/EditTodo";
import { navigate, routes } from "@redwoodjs/router";

const DELETE_TODO = gql`
  mutation DeleteTodoMutation($input: DeleteTodoInput) {
    deleteTodo(request: $input) {
      id
      name
      done
    }
  }
`;

const ViewTodo = ({ todo }) => {
  const [showEditModal, setShowEditModal] = useState(false);
  const [deleteTodo] = useMutation(DELETE_TODO, {
    onCompleted: () => {
      navigate(routes.todo());
    },
  });

  function deleteTodoFn() {
    if (window.confirm("Do you want to delete this item?")) {
      deleteTodo({
        variables: {
          input: {
            id: parseInt(todo?.id),
          },
        },
      });
    }
  }
  return (
    <div className={styles.container}>
      <head>
        <title>Todo app</title>
        <link rel="icon" href="/favicon.ico" />
      </head>

      <main className={styles.main}>
        <div className={styles.breadcrumb}>
          <div>
            <span style={{ margin: "1px" }}>
              <button onClick={() => navigate(routes.todo())}>
                Go to Todos
              </button>
            </span>
          </div>
        </div>

        <div className={styles.accountcontainer}>
          <div className={styles.youraccounts}>
            <h3>View Todo</h3>
          </div>
          <div>
            <div>Todo</div>
            <div>
              <h2>{todo?.name}</h2>
            </div>
            <div>Status: {todo?.done ? "Completed" : "In-complete"}</div>
          </div>
          <div style={{ padding: "15px 0" }}>
            <span>
              <button
                onClick={() => setShowEditModal((pV) => !pV)}
                style={{ marginLeft: "0", marginRight: "2px" }}
                className="btn"
              >
                Edit
              </button>
              <button onClick={deleteTodoFn} className="btn btn-danger">
                Delete
              </button>
            </span>
          </div>
          {showEditModal ? (
            <EditTodo todo={todo} closeModal={() => setShowEditModal(false)} />
          ) : null}
        </div>
      </main>
    </div>
  );
};

export default ViewTodo;
This page basically renders a todo item details and also gives room for deletion/removal of the todo item.
See the two buttons Edit and Delete. The Edit button brings up an EditTodo component which is a modal, this component is where the todo item can be edited and saved to the db. We will come to it soon.
The Delete button calls the deleteTodo mutation with the id of the todo to delete the todo from the db. See how we followed the best practices, I urge you to do the same in your applications.
So let's see the AddTodo and EditTodo components.
AddTodo
This is where new todos are added to the db.
import { useMutation } from "@redwoodjs/web";
import { useRef, useState } from "react";

const ADD_TODO = gql`
  mutation CreateTodoMutation($input: CreateTodoInput) {
    createTodo(request: $input) {
      id
      name
      done
    }
  }
`;
const AddTodo = ({ closeModal }) => {
  const [disable, setDisable] = useState(false);
  const formRef = useRef();
  const [createTodo] = useMutation(ADD_TODO, {
    onCompleted: () => {
      window.location.reload();
    },
  });
  function addTodo(params) {
    const { todoName } = formRef.current;
    const name = todoName.value;
    createTodo({
      variables: {
        input: {
          done: false,
          name,
        },
      },
    });
    window.location.reload();
  }

  return (
    <div className="modal">
      <div className="modal-backdrop" onClick={() => closeModal()}></div>
      <div className="modal-content">
        <div className="modal-header">
          <h3>Add Todo</h3>
          <span
            style={{ padding: "10px", cursor: "pointer" }}
            onClick={() => closeModal()}
          >
            X
          </span>
        </div>
        <div className="modal-body content">
          <form ref={formRef}>
            <div style={{ display: "flex", margin: "2px 2px 0 0" }}>
              <div
                style={{ flex: "1 1 100%", margin: "0 0 2px 5px" }}
                className="inputField"
              >
                <div className="label">
                  <label>Name</label>
                </div>
                <div>
                  <input
                    name="todoName"
                    type="text"
                    placeholder="What do you want todo next?"
                  />
                </div>
              </div>
            </div>
          </form>
        </div>
        <div className="modal-footer">
          <button
            className="btn-danger"
            style={{ marginLeft: "0" }}
            onClick={() => closeModal()}
          >
            Cancel
          </button>
          <button disabled={disable} className="btn" onClick={() => addTodo()}>
            Add
          </button>
        </div>
      </div>
    </div>
  );
};

export default AddTodo;
We have a createTodo mutation string set, it carries the details of the todo item we wish to create.
See that this component has an input box where we can input the text of the work we intend to do. The Add button will call the addTodo function, this function will get the todo text from the input box, and call the createTodo mutation. The details of the todo are passed to this mutation function.
EditTodo
import { useMutation } from "@redwoodjs/web";
import { useRef, useState } from "react";

const UPDATE_TODO = gql`
  mutation UpdateTodoMutation($input: UpdateTodoInput) {
    updateTodo(request: $input) {
      id
      name
      done
    }
  }
`;
const EditTodo = ({ todo, closeModal }) => {
  const [disable, setDisable] = useState(false);
  const formRef = useRef();

  const [updateTodo] = useMutation(UPDATE_TODO, {
    onCompleted: () => {
      window.location.reload();
      setDisable(false);
    },
  });

  function updateTodoFn() {
    const { todoName, doneStatus } = formRef.current;
    const name = todoName.value;
    const done = doneStatus.checked;

    updateTodo({
      variables: {
        input: {
          id: parseInt(todo?.id),
          name,
          done,
        },
      },
    });
  }
  return (
    <div className="modal">
      <div className="modal-backdrop" onClick={() => closeModal()}></div>
      <div className="modal-content">
        <div className="modal-header">
          <h3>Edit Todo</h3>
          <span
            style={{ padding: "10px", cursor: "pointer" }}
            onClick={() => closeModal()}
          >
            X
          </span>
        </div>
        <div className="modal-body content">
          <form ref={formRef}>
            <div style={{ display: "flex", margin: "2px 2px 0 0" }}>
              <div
                style={{ flex: "1 1 100%", margin: "0 0 2px 5px" }}
                className="inputField"
              >
                <div className="label">
                  <label>Name</label>
                </div>
                <div>
                  <input
                    name="todoName"
                    type="text"
                    placeholder="What do you want todo next?"
                    defaultValue={todo?.name}
                  />
                </div>
              </div>
              <div
                style={{ flex: "1 1 100%", margin: "0 0 2px 5px" }}
                className="inputField"
              >
                <div className="label">
                  <label>Status(Done)</label>
                </div>
                <div>
                  <input
                    type="checkbox"
                    name="doneStatus"
                    defaultChecked={todo?.done}
                  />
                </div>
              </div>
            </div>
          </form>
        </div>
        <div className="modal-footer">
          <button
            className="btn-danger"
            style={{ marginLeft: "0" }}
            onClick={() => closeModal()}
          >
            Cancel
          </button>
          <button
            disabled={disable}
            className="btn"
            onClick={() => updateTodoFn()}
          >
            Save
          </button>
        </div>
      </div>
    </div>
  );
};

export default EditTodo;
This is quite similar to what we have in the AddTodo component.
This component sets the values of the input boxes with the details from the todo object. Now, the user can edit the details of the todo from the input boxes.
The Save button is clicked to save the edited todo details to the db. The button calls the updateTodoFn function, this function calls the updateTodo mutation with the new details of the todo from the input boxes. This modifies the todo with the id with the data from the input boxes.
You see that building with RedwoodJS is very easy. It just needs you to understand how to separate your code and UI, and also know how to call the endpoints and work with the data returned.
Now, we test our app.
Test app
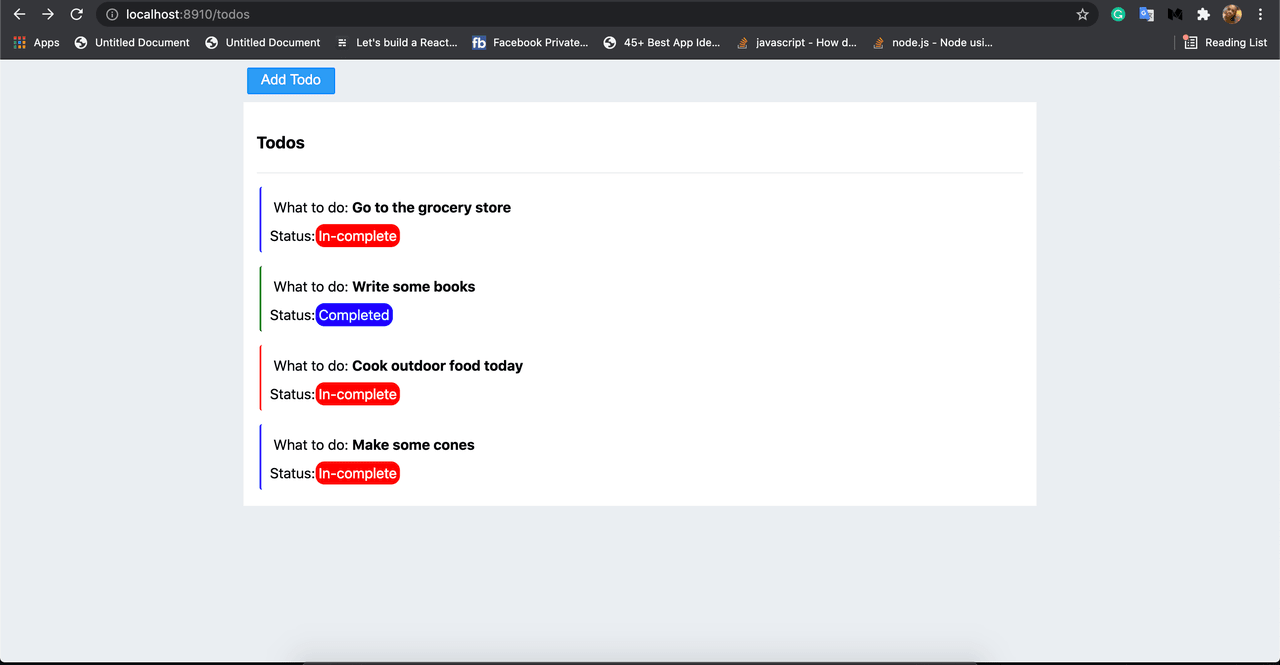
View todos

Todo list
Create todo
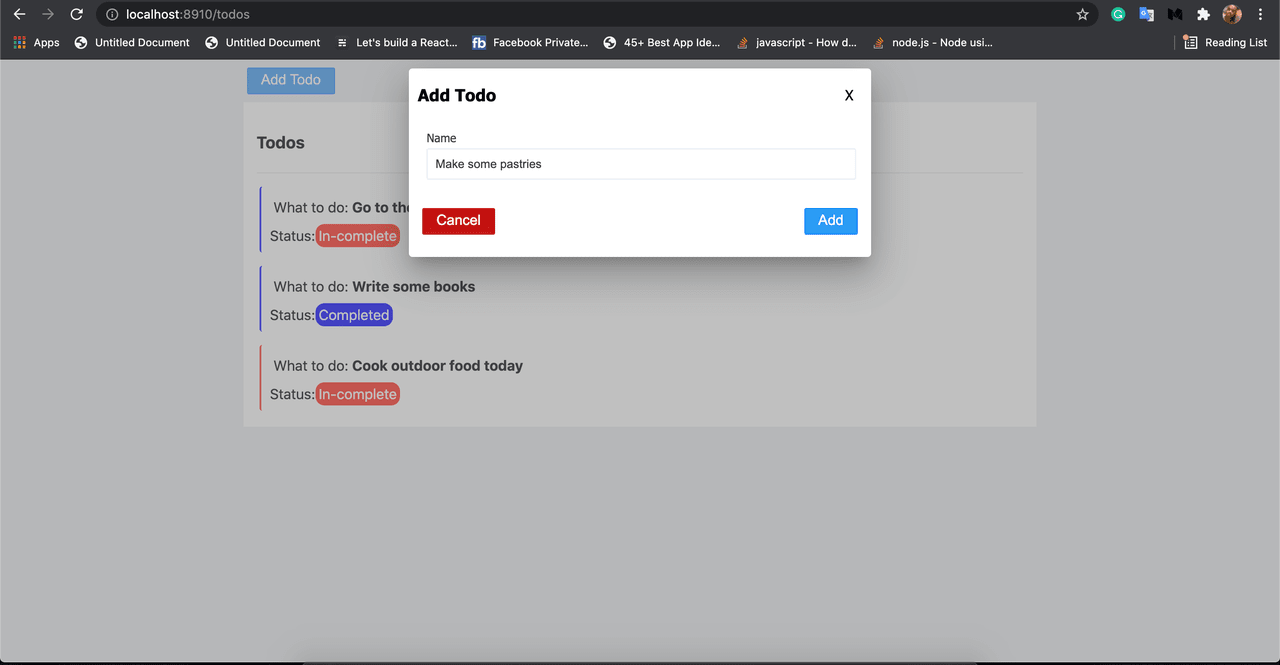
Create todo dialog

List displaying newly added todo
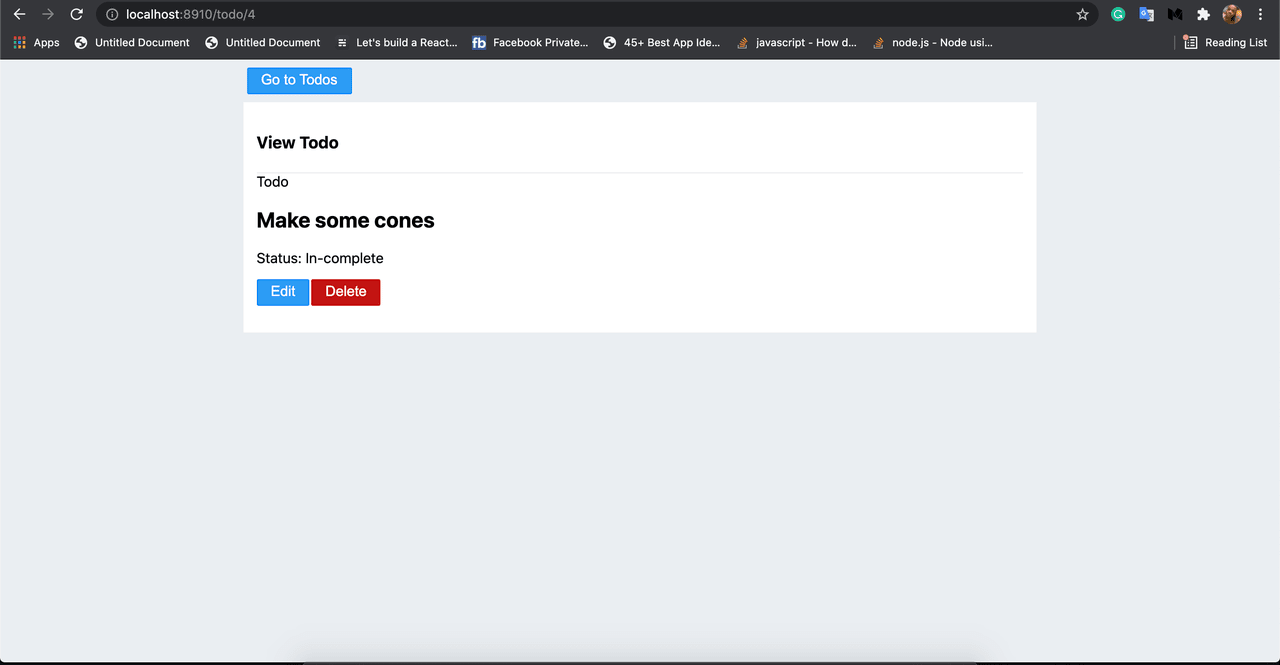
View todo
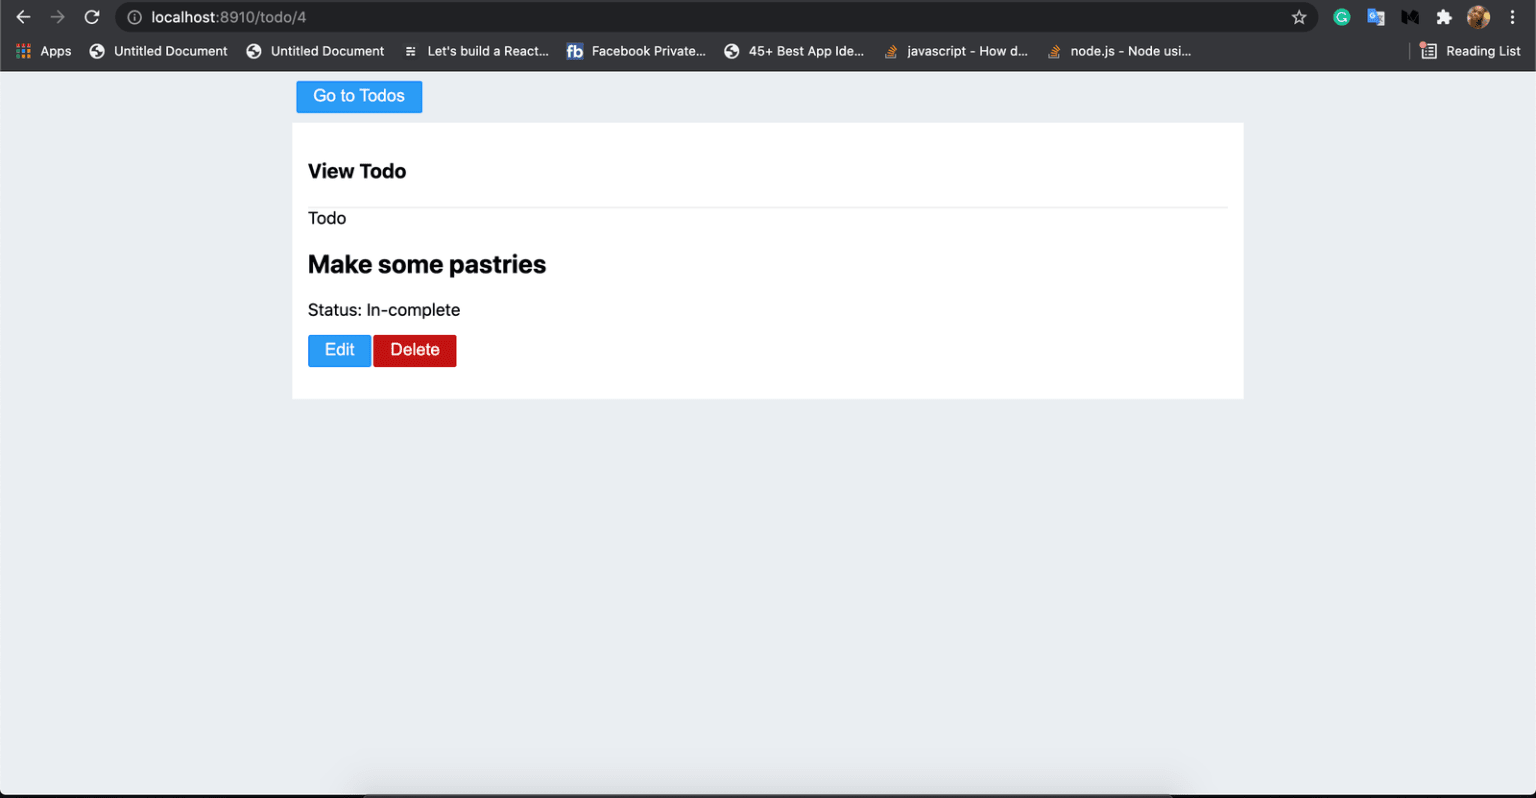
View a todo item
Edit todo
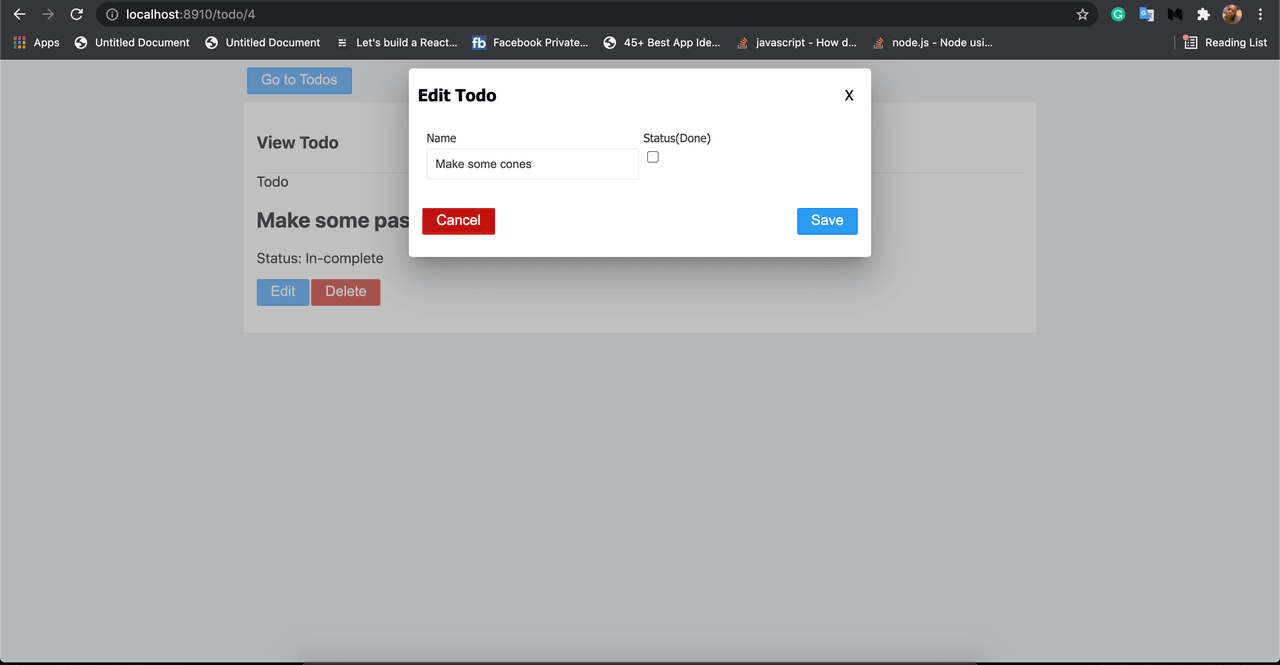
Edit a todo dialog
view edited todo item
Delete todo
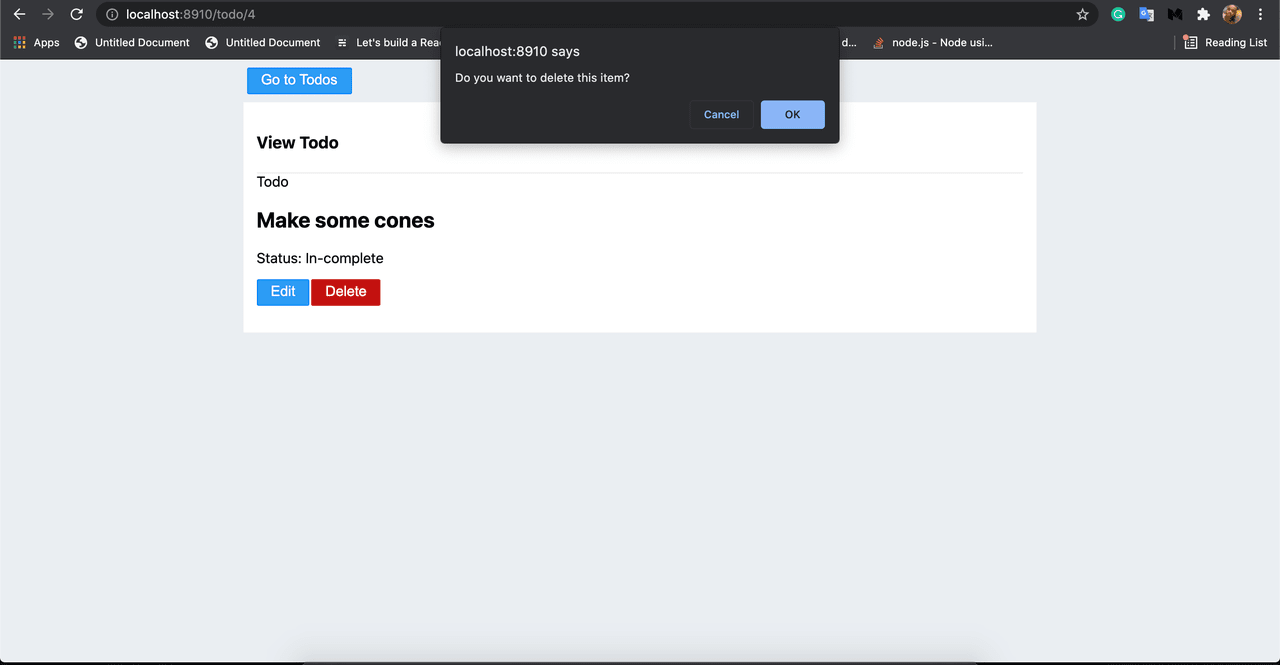
Delete todo prompt
Todo list without the deleted todo item.
Conclusion
RedwoodJS is awesome as it comes. It is so easy to comprehend and has well-written documentation with nice tutorials.
In this post, we started by introducing the RedwoodJS project. Next, we learned how to scaffold a Redwood application, then we analyzed the folders and files contained in a RedwoodJS application. In the next sections, we discussed and explained some basic RedwoodJS features like Routing and the data-fetching Cells. Lastly, we listed the basic command of RedwoodJS.
Thanks!
Source code
https://github.com/redwoodjs-prjs/redwoodprj