.png)


Let's consider a scenario where you are contributing to an open-source project.
- You forked a project.
- You cloned the repository.
- You made some changes.
- You pushed the changes.
- Time to create a pull request — but the original master branch has more commits now. 🤕
What to do now? You might have struggled with this scenario at some time in your career. Most of the beginners still do.
To all those struggling, this guide will help you handle such a situation and help you understand the underlying concepts of git as well. So let's get started!
👨💻 Current State of Git Branches
Below is the visualization of the current scenario.
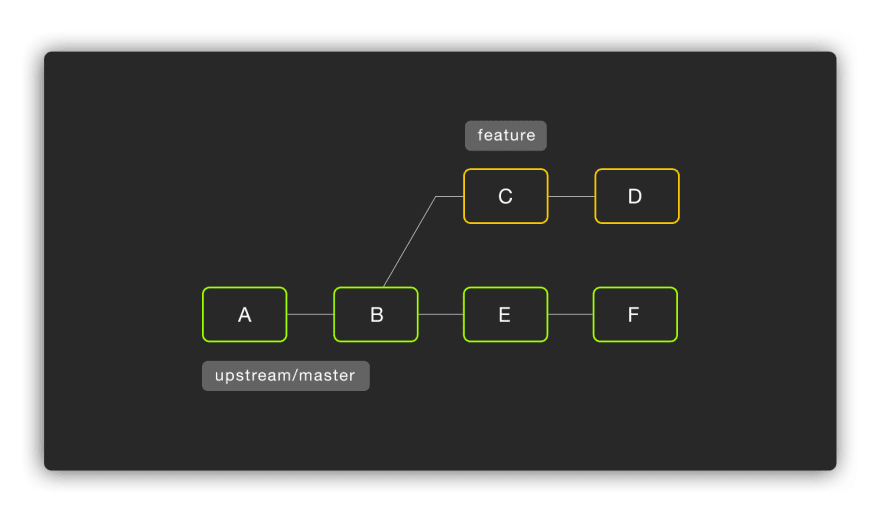
For those who are not familiar with the concepts of upstream, it's not the local or the forked one, it points to the original repository on GitHub. It is not set by default. You need to manually link your cloned repo with upstream.
🎯 Pointing to The Upstream
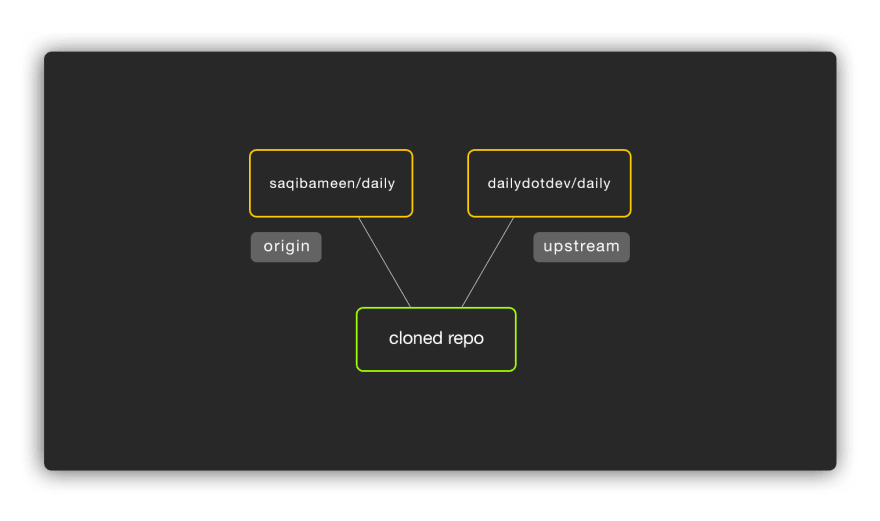
For the sake of convenience let's assume two repos:
Original — https://github.com/dailydotdev/daily
Fork — https://github.com/saqibameen/daily
Below is the git command to do it.
# Add Upstream Remote.
git remote add upstream https://github.com/dailydotdev/daily.git

# Fetch latest updates from it.
git fetch upstream
Remember that, those updates will be in upstream/[BRANCH_NAME]. With that done, now your remote pointers in local repo look like below:
At this stage, we have upstream/master available locally and we need to bring the new commits (namely, E and F in our diagram) to our feature branch. We have two options here:
- Merge
- Rebase
Both can be used to obtain the end result — get the latest updates from upstream/master and keep our commits as well.
🔗 Using git merge
Make sure you are on the feature branch. Use the following command to do the merge:
# Merge upstream/master to feature branch.
git merge upstream/master
If there are any conflicts in the merge, resolve them. Otherwise, just write the merge-commit message and you are all set. Behind the scene, your feature branch looks like this. The last commit is the merge commit that you do whenever you perform a merge.
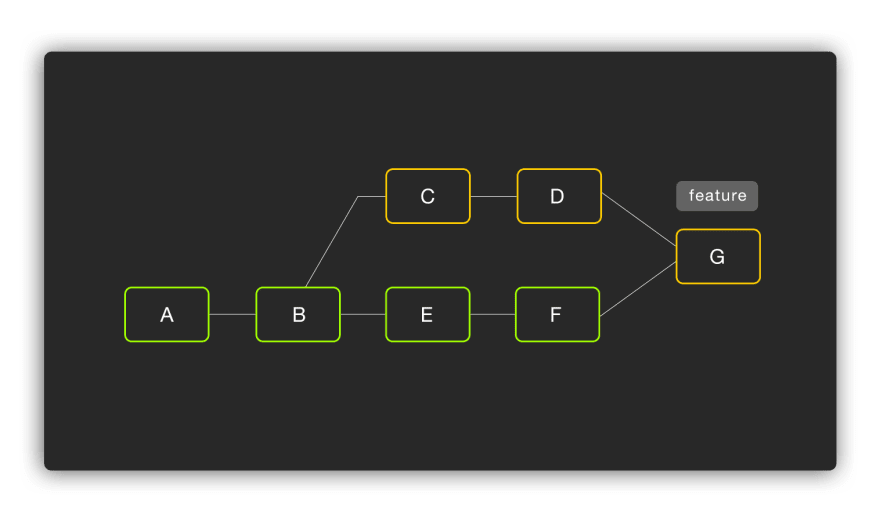
Just a little convoluted history, which you might not want. All you want is your changes on top of the upstream/master followed by a push origin and a pull request.
🏗 Using git rebase
git rebase is something I find a perfect fit for such a scenario. With it, you get a clean git history and nothing more. So, instead of the git merge, you can do the following:
# Rebase feature branch on top of upstream/master
git rebase upstream/master
Now, take a look at how the feature branch looks like:
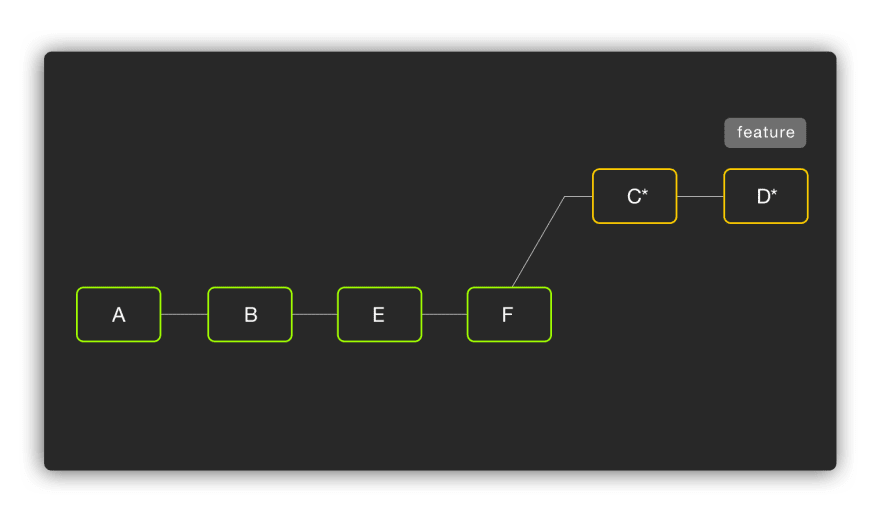
Did you notice the stars(*) on top of commit C and D? If you are not familiar with git rebase, I used them to indicate that these commits are a copy of the original commits C & D.
🤔 Take a look at the feature branch — probably exactly what we need for PR; not anything more. Perfect!
UPDATE:
You can also use the following command to achieve this all in one command.
git pull upstream master --rebase
🚀 Push the changes
Let's see in both cases how git push works. After that, we only need to create a PR.
# Push changes to the origin.

#In case of merge
git push origin feature

# In case of rebasing
git push --force origin feature
Did you notice the --force flag in case of rebasing? It is because we are re-writing history. 🙈
The feature branch initially had the following commits:
A — B — C — D
With rebase, we changed it to:
A — B — E — F — C* — D*
So, not only we created copies of C, and D commits, we also put E, and F at their original positions: git history is changed. That's why we need --force flag. Otherwise, you might get an error.
Because of the fact that
git rebasecopies commits and changes history, don't use it when you shared those commits with the team. Be careful while using it. A perfect scenario is when you haven't shared your work with anyone.
🙌 Wrap Up!
Learning through use-cases is the best way to master anything. You don't only solve that problem but also get to understand the usage of tech involved in the process.
I hope this post will help you not only get through this situation but also understand how git merge and git rebase differ and where to use them. If you have any questions, feel free to drop them in the comments section below.
Thanks to Daily, developers can focus on code instead of searching for news. Get immediate access to all these posts and much more just by opening a new tab.