.png)


Chat applications are the medium through which the world communicates nowadays. Every smartphone user is involved in the daily conversation using the chat applications available. Among the list of the widely used and popular chat applications. WhatsApp chat application is one of them. The application is pretty simple and easy to use with a modern intuitive UI design. Almost anyone can use it without any prior interaction with this app because the overall workflow and UI designs are easy to understand. Hence, such applications have made the world smaller. With the high demand for messaging features in every app, there is also a high demand for intuitive and powerful UI screens with state-of-the-art features. The elements used in UI affect the overall usability of the application. It impacts the user experience and interaction with the app. Hence, we need to be able to provide a clean and intuitive UI for the users.
Looking at how simple WhatsApp messaging application user interface is, we are going to make the UI resembling that of the original WhatsApp application using the Flutter mobile application development framework. The main goal is to showcase the Flutter app programming by creating the WhatsApp conversation list screen. With the ability to produce pixel-perfect UI designs, we are going to see how Flutter makes the UI implementation easy and beautiful.
So, Let's get started!
Create a new Flutter project
First, we need to create a new Flutter project. For that, make sure that the Flutter SDK and other flutter app development-related requirements are properly installed. If everything is properly set up, then in order to create a project, we can simply run the following command in the desired local directory:
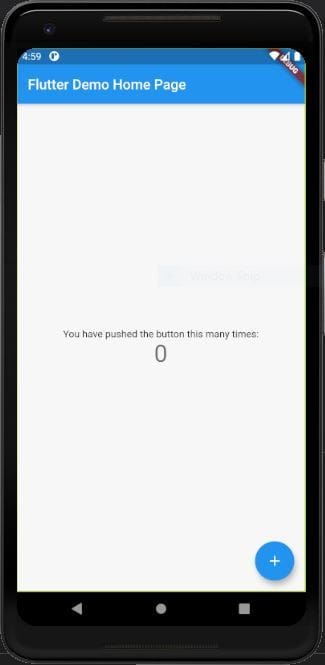
After the project has been set up, we can navigate inside the project directory and execute the following command in the terminal to run the project in either an available emulator or an actual device:
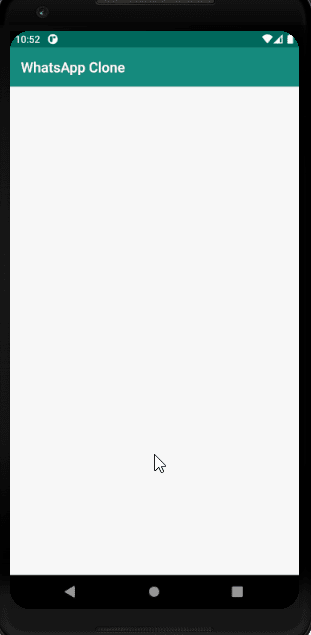
After successfully built, we will get the following result in the emulator screen:
Clean up main.dart
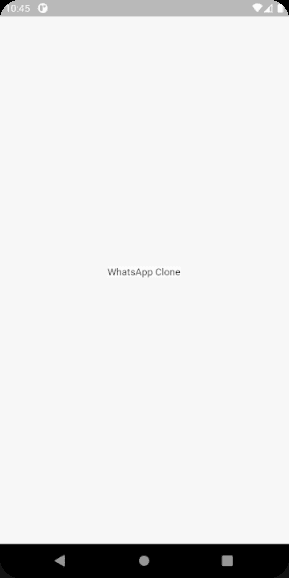
First, we are going to clean up our main.dart file. By clean up, we mean to remove the default template code and simplify the overall code structure in main.dart file. The code after the clean up is provided in the code snippet below:
Here, in the home property of the MaterialApp widget, we have kept a simple Scaffold widget with a body property containing a Text element.
Hence, we will get the result as shown in the code snippet below:
Create Conversation List screen
After the clean up, we can go on to create a conversation list screen which will have two sections:
- The stories section at the top.
- Conversation list section below the stories section
- It will also have a custom App bar at the top
We are going to create the screen files in a separate folder. So inside the ./lib folder, we need to create a folder called ./screens which will store the screen file for the app. Inside the ./lib/screens folder, we need to create a file called conversations.dart.
Now, we can add a simple Stateful widget class inside the conversation.dart file as shown in the code snippet below:
Here, we have only kept a custom app bar using AppBar widget and an empty Container in the Scaffold body.
Now in the main.dart, we need to replace the Scaffold widget in the home property of the MaterialApp widget with the Conversations widget from the conversation.dart file:
Hence, we will get the result as shown in the code snippet below:
Customizing AppBar UI
Now that we have a conversations screen, we can start adding different sections to it. First, we are going to start with modifying the AppBar widget by adding some clickable icons. The code for this is provided in the code snippet below:
Here, by using the actions property offered by AppBar widget, we have added the clickable icons using IconButton widget.
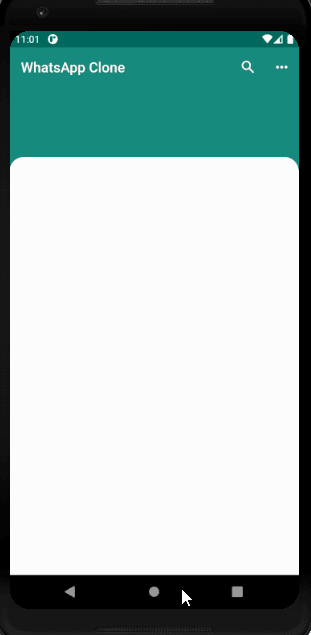
Hence, we will get the result as shown in the code snippet below:

Splitting the Body section UI
In this step, we are going to section out the portion of conversation screen body UI into two sections. The stories section and the conversation list section. The separation will be based on the style of the containers. The overall coding implementation is provided in the code snippet below:
Here, we have replaced the empty Container widget in the body of Scaffold with a Column widget. Then, we have used two Container widgets as children of Column widget with different style properties. Of course, both these container represents the different section of UI containing their own set of child widgets. The upper Container is for the Stories section and the below one wrapped by Expanded widget is for the conversations list.
Hence, our body UI section will look as shown in the emulator screenshot below:
Creating mock Image List
Now for the stories as well as the conversation list we need some mock images. So, here we have accumulated some mock Images URLs from the randomuser site. We have stored the URLs as a List in the conversation.dart file as shown in the code snippet below:
Creating Story section
Now, we are in the important UI sections. In this step, we are going to create the stories section like in the actual WhatsApp messaging application. The important thing is we are going to create the story item as a separate reusable widget.
For that, we need to create a folder called ./components inside the ./lib directory. Inside, ./lib/components directory, create a file called storyItem.dart. This file will hold the widget code for each individual story item in the stories section.
The UI implementation of story item is provided in the code snippet below:
The StoryItem widget accepts the image url and name as props. Then, we have returned the Padding widget as a parent widget which has Column as a child widget. The Column widget has a CircularAvatar widget which will allow us to display the image in the circular style. Inside the CircularAvatar widget, we have used the NetworkImage with URL to fetch the image and display it. Just below the CircularAvatar, we need to display the name of the person. Hence, we have used the Text widget with a little separation from the SizedBox widget.
Now in the conversations.dart, we need to create a horizontal list in the upper Container of the body. For list, we are going to use the ListView widget with horizontal scrollDirection so that the stories can be scrolled horizontally. Then as children of ListView widget, we are going to call the storyItem widget by passing the different image URL values and name as props. The overall coding implementation is provided in the code snippet below:
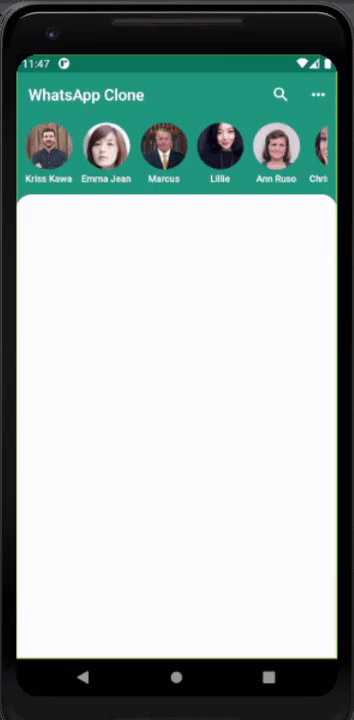
Hence, we will get the stories section as shown in the demo below:
Creating Conversation List section
Now, we are going to add the Conversation List UI just below the stories section in the lower Container of the conversations.dart screen. Just like in story items widget, we are going to create separate widget for conversation list items as well called conversation.
Inside the ./lib/components directory, we need to create a file called conversationList.dart. The overall coding implementation of this widget is provided in the code snippet below:
The widget accepts five properties. The image url, name, message, time, and a messageSeen Boolean value. These all props are passed down from the parent widget. Here, we have returned InkWell as a parent component to make each item in the conversation list clickable with effect. Then, we have the Row widget with its children widget to show the image, name of user, last message, time of message, and an icon with conditional rendering with messageSeen variable to show if the message is seen by the user or not.
Now in conversations.dart, we need to create another ListView in the lower Container. This ListView will be scrollable vertically. Then, we need to call the conversation widget as children of ListView widget by passing the required properties as shown in the code snippet below:
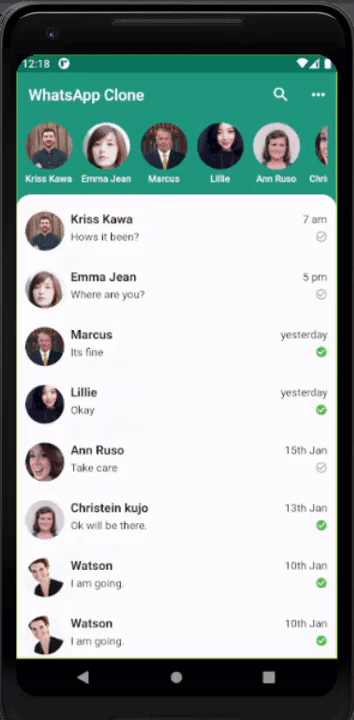
Hence, we will get the conversation list as shown in the demo below:
Finally, we have successfully completed the WhatsApp clone Conversations screen UI using Flutter/dart coding.
Recap
The main objective of the tutorial was to demonstrate how to create a clean and beautiful UI of the WhatsApp clone conversation screen using the Flutter/dart coding eco-system. The overall UI was easy to implement and also looks simple. The looks and intuitiveness of the UI resemble that of the original WhatsApp messaging application. Along with the implementation of screen UI, we can also learn how to structure out the code into different widgets so that the code is reusable. This is will make the overall code look clean and easy to understand as well. Now, the challenge to implement the messaging screen for this app which you can implement using similar UI and coding structures.
These semi-social chat apps are coming more and more into demand. There are other social applications as well that you should check out. You can also check out some of the most amazing React Native TikTok templates in the market for inspiration on UI implementation and features.