.png)


In this tutorial, we will learn the basics of Blitz.js. Have you heard about it? If not don't worry we will demystify everything about Blitz.js and the goodies it brings to the web development world.
What is Blitz.js?
Blitz.js is a full-stack React framework with a zero-API data layer built on Next.js and inspired by Ruby on Rails.
According to Blitzjs.com landing page, new Blitz.js apps come with all the boring stuff already set up for you! Like ESLint, Prettier, Jest, user sign up, log in, and password reset. Blitz.js also provides helpful defaults and conventions for things like routing, file structure, and authentication while also being extremely flexible.
Blitz.js uses the concept of the "Zero-API" data layer. This Zero-API enables us to add server code in the React components, Blitz.js will generate the HTTP API at build time. This removes the need of adding API endpoints in our project and making an HTTP request to them via the client side.
Blitz.js includes everything we will ever need in a web development project, from the database to the frontend. It includes:
Database
Blitz.js gives us the database to use right away after scaffolding a Blitz.js project. It uses Prisma 2 ORM to interact with databases.
“Prisma 2 is not required for Blitz.js. You can use anything you want, such as Mongo, TypeORM, etc"
Prisma is an open-source ORM tool for Node.js and TypeScript, that simplifies connection, querying, migrations, and data modeling to SQL databases.
The default database of Blitz.js is SQLite, although you can configure it to use other databases like MongoDB, MySQL, PostgreSQL, SQLServer, etc.
Frontend
Blitz.js has the front end already prepared for us. It builds on Next.js so the code, file structure, and features are majorly from Next.js.
Authentication
Blitz.js has authentication already baked in. Blitz.js provides Login, Signup, and Password reset components. It also has mutations to change password, reset password, login, signup, log out, and request for a forgotten password.
Testing
Blitz.js uses Facebook's Jest testing library to run tests and lets us write tests for our components and endpoints.
We will build a simple to-do app to demonstrate and explain most concepts of Blitzjs.
Requirements
We will need a few binaries and tools installed in our system before using Blitzjs.
- Node.js: Blitz.js is Node.js-powered so we will need the Node.js image installed in our machine. The required version is from version 12 and above.
- NPM: This comes bundled with Node.js, run the command npm --version to verify it's installed.
- Yarn: This is a fast Node package manager alternative to NPM. We install it using the NPM: npm i yarn -g.
Now, we are set. In the below section we will install the Blitz.js CLI.
Installing the Blitz.js CLI
Blitz.js team provided a CLI tool to run Blitz.js commands. We can use the CLI tool to generate pages, queries, mutations, and Prisma models. We can use the CLI tool to scaffold a new Blitz.js project, start the Blitz.js server on a project, run migrations on our Prisma schema, and a lot more.
To do all those above we will have to first install the Blitz.js CLI tool. Run the below command to do so:
The above command will install the blitz CLI in our machine, and we can access it globally from any directory in our machine.
Your own output will be different.
The Blitz.js command help page can be found here: https://blitzjs.com/docs/cli-generate
In the next section, we will scaffold a Blitz.js project.
Scaffolding a Blitz.js project
Go to the directory where you want the Blitz.js project to reside, and run the below command:

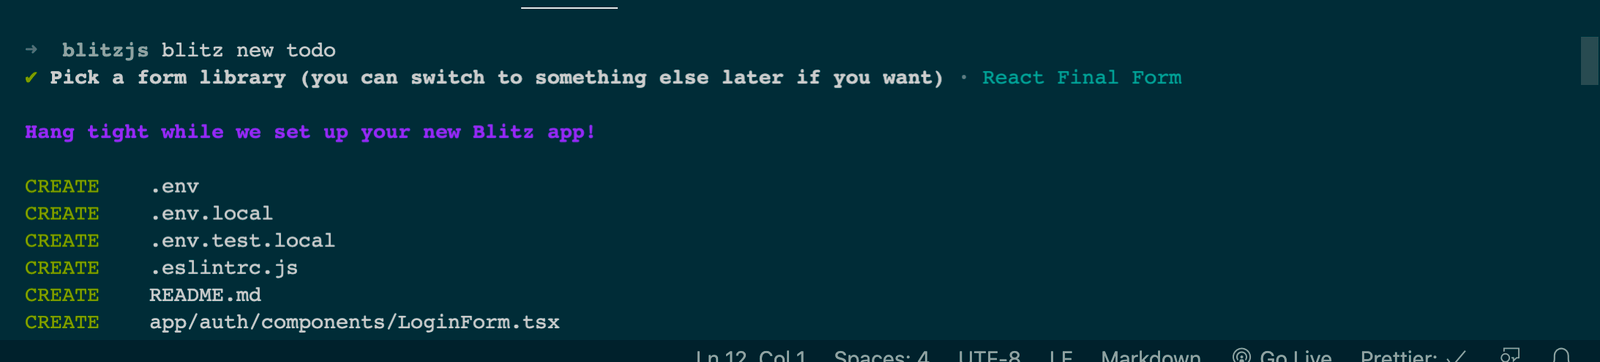
The blitz new command is used to scaffold a new Blitz.js project. It will prompt you to pick a form library, press "Enter" to select the recommended library, React Final Form.
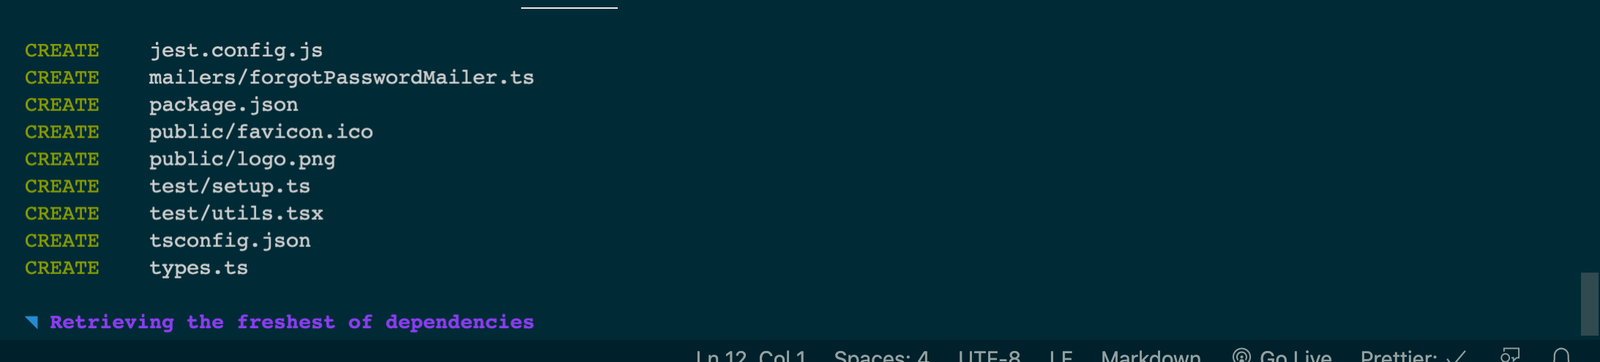
Hang on tight as Blitz.js sets up your new Blitz.js app. Blitz.js will create a Blitz.js project on todo folder and then proceed to install its dependencies.
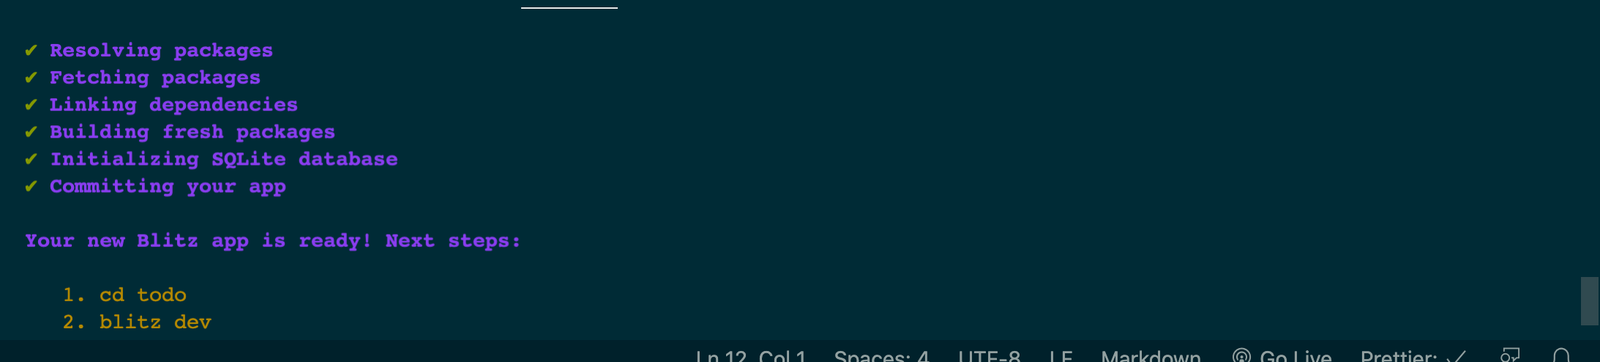
After installation, your Blitz.js app is ready!
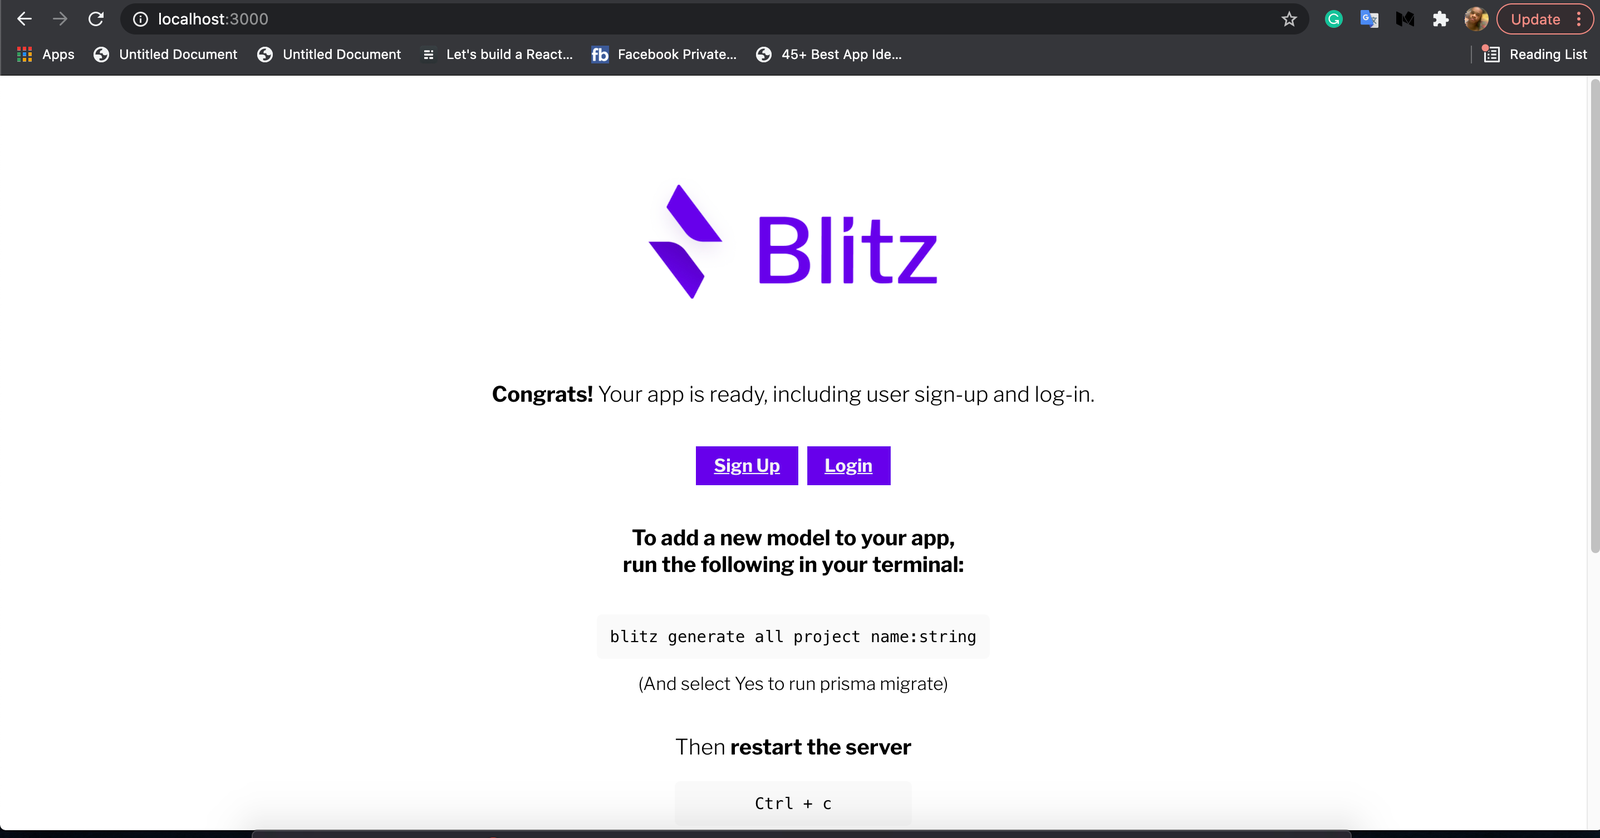
Now, move into the todo folder and run the blitz dev command to start the Blitz.js server. The server will be started at localhost:3000, so navigate to the localhost:3000 URL in your browser. You will see the page loaded:
Blitz.js app structure
Let's look into our todo folder.
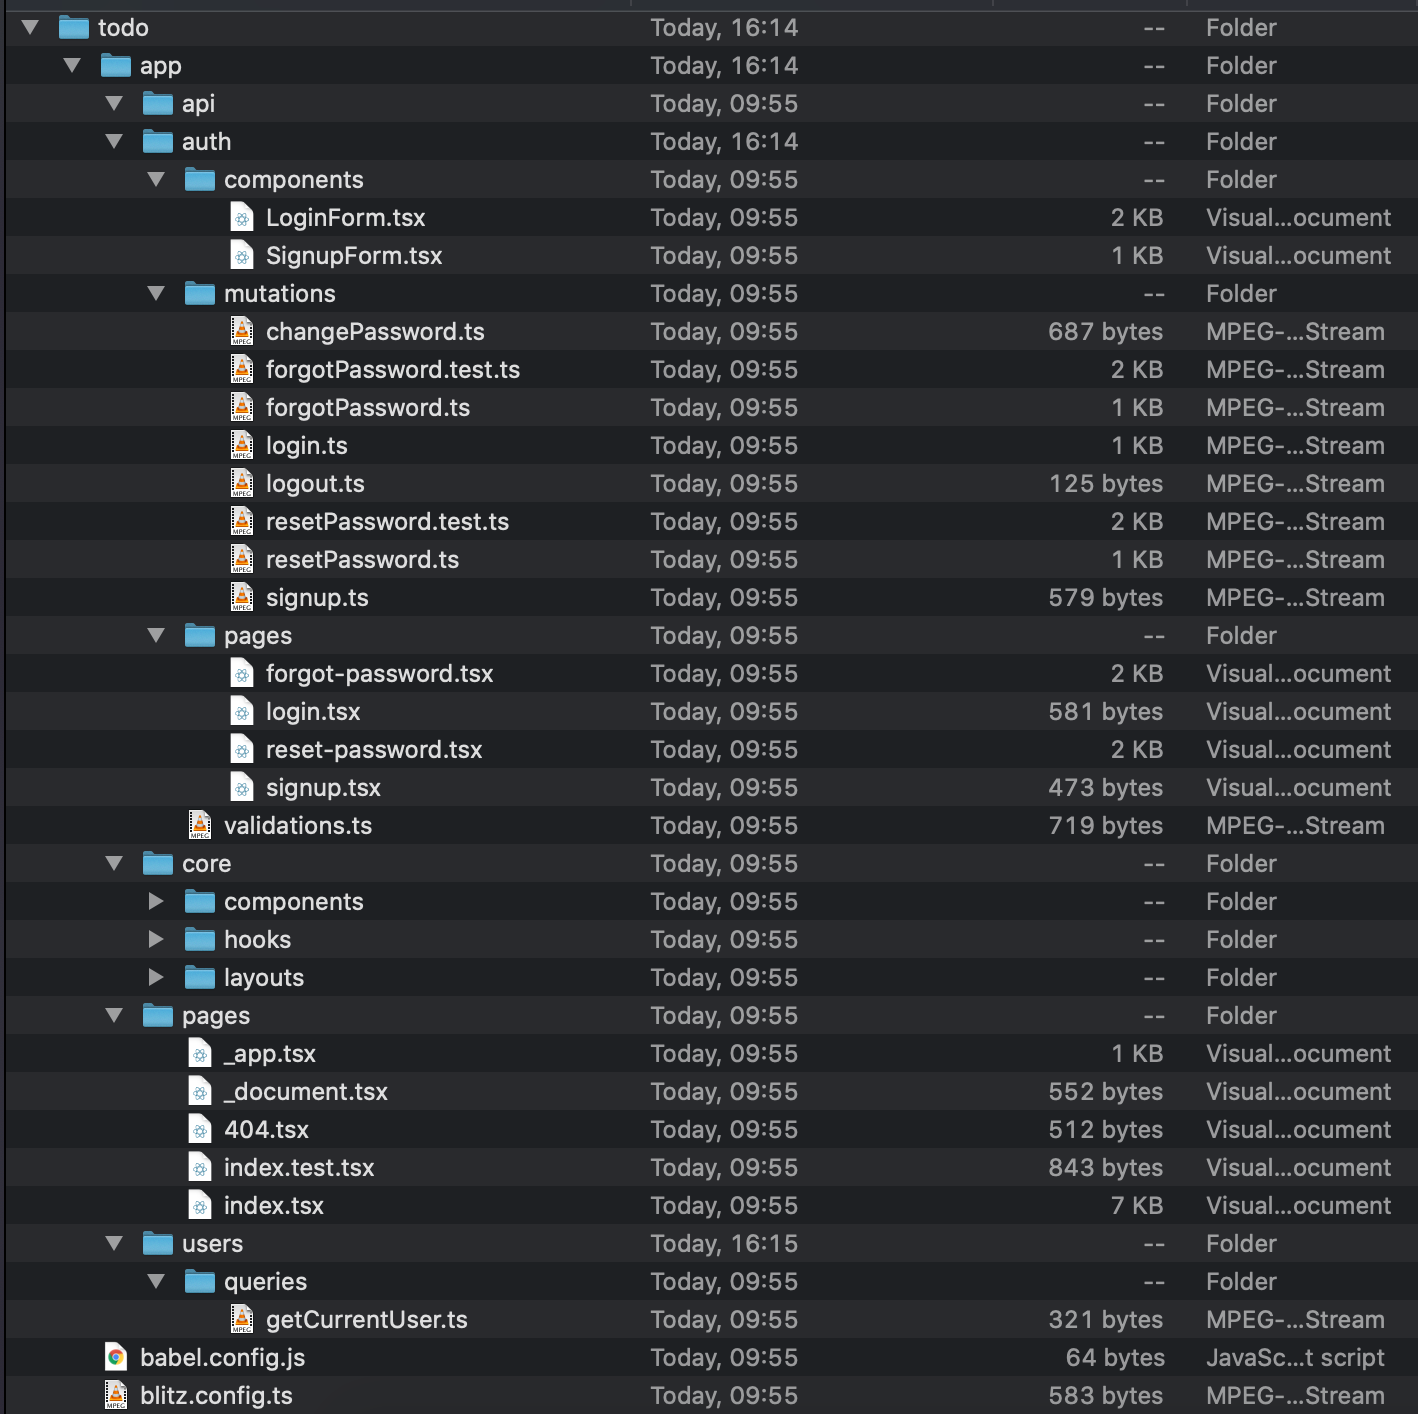
The app is the central place where the bulk of our frontend code is kept. Components both page components and presentational components are kept here. APIs reside here also.
The app/api is where our API files are kept.
The app/auth contains our authentication code. The components/LoginForm.tsx is a component that renders the login UI. The components/SignupForm.tsx is a component that renders the signup UI.
The mutations folder contains mutation resolvers for the authentication scheme. In Blitz, mutation resolvers are kept inside a mutations folder, and each file in the folder exports a function by default export. The function will accept the arguments:
- input: any: This is the parameter used to pass details to the function. For example, we can pass the username and password of a user when trying to log in.
- ctx: Ctx: This is an object that contains info about the HTTP request.
The mutations/changePassword.ts is a mutation file. It is called when we want to change our system password. The mutations/forgotPassword.ts is a mutation file, that is called to request for a new password to be sent to our email. The mutations/login.ts is called to log in a user. Username and email details are provided to authenticate the user. The mutations/logout.ts is a mutation resolver used to log out users. The mutations/resetPassword.ts is a mutation resolver called to reset a forgotten password. The mutations/signup.ts is a mutation resolver used to create a new user. The app/auth/pages hold the authentication pages. The app/auth/pages/login.tsx will be rendered when the /login URL is navigated to. The file is a page component, inside it, it renders the LoginForm. The app/auth/pages/signup.tsx is a page that will be rendered when the route /signup is navigated to. This page component renders the SignupForm. The app/auth/pages/forgot-password.tsx file is loaded when the route /forgot-password is navigated to. This page renders the UI where users can enter their email so they are sent a link to reset their password. The app/auth/pages/reset-password.tsx is a page component that is loaded when the URL path /reset-password is navigated to in the browser. This page is where a new password is set to reset the old password. The validations file contains code that sets the data types of the authentication forms in our project. The app/core folder is where components, hooks, and design layouts are kept. The components are presentational components that can be used throughout the project. the hooks and layouts also are a re-usable piece of code that can be reused in the app. The pages folder contains page routes in the project. All files inside this folder become a page file and they will export a component that will render a UI when its corresponding URL path is loaded in the browser. Inside this pages we have the below files:
- _app.tsx: This file is not a page file, it wraps each page component when their corresponding URL path is navigated. So this _app.tsx is where we can send data to each page component or add a UI we want to appear on every page e,g a header.
- _document.tsx: This file is similar to _app, it is not a page component but it wraps every page component that is being loaded. Here, we can set the document title, scripts, or any other thing concerning the Document model we want to appear on every page.
- 404.tsx: This page component is loaded when a non-existing page route is navigated to.
- index.tsx: This page component is the default index page of the project. This will be loaded when the URL path / is navigated.
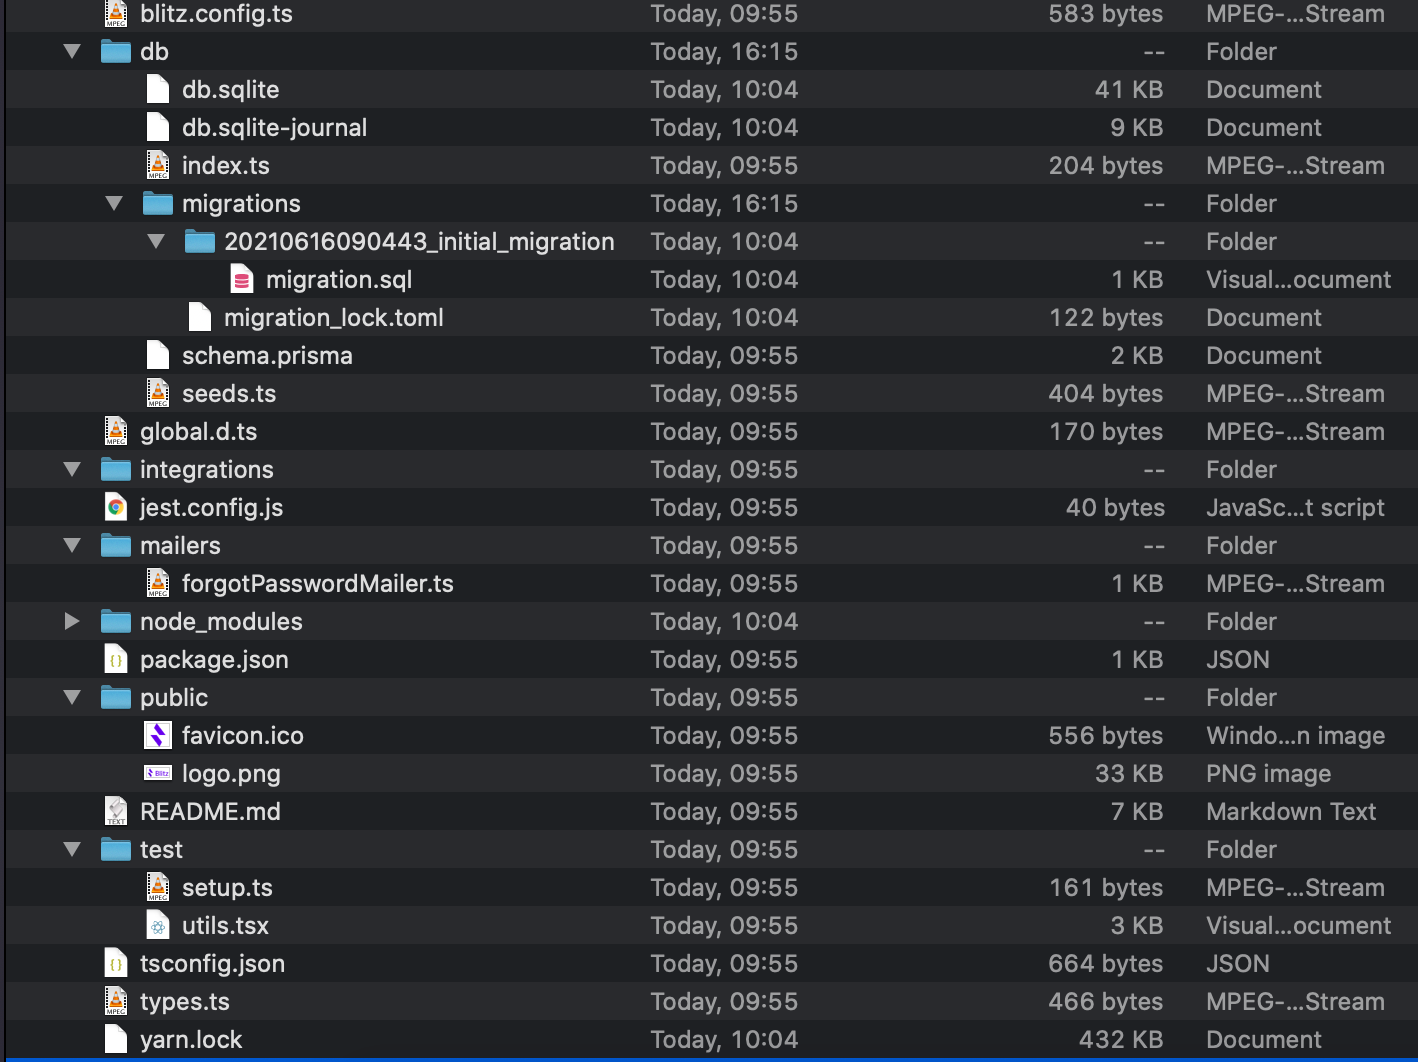
The users/queries/getCurrentUser.ts is a query resolver that returns the currently logged-in user. We have the db folder, this folder is where the database migrations, Prisma schema, and configurations are kept. The db/migrations folder is where generated migrations files are kept. The db/db.sqlite is the SQLite database where the content is stored. The db/schema.prisma file is where our Schema models are kept. The mailers folder is where functions used to send emails are kept. A single file in this folder must export a function that will be called by the framework. The mailers/forgotPasswordMailer.ts file is called to send a forget-password reset instruction email to a user. The public folder is where all the static assets to be used in our app are kept. Static assets can include videos, images, audio files, etc. The blitz.config.js file is where our Blitz.js configuration is done and kept. Other files like .eslintrc, jest.config.js, babel.config.js, .env, etc are where various configurations for different tools are used in Blitz.js are all kept. Let's look at the database and Prisma configs in Blitz.js more in-depth.
The database
The default database used by the Prisma in Blitz.js is SQLite. The schema.prisma is where our database models are kept. Open the schema.prisma file:
The datasource db is where the type of database the Prisma will use is configured. See that the provider is set to sqlite this tells Prisma that we will be using the SQLite database. If we want to use MongoDB database, we will set the provider to mongodb. The url is the URL path to the database server. The generator client is where we set the client library that the Prisma will use to connect to the provided database and also to perform queries on the database. Prisma comes with its default client library for all major databases, it is the prisma-client-js. The models we see are table representations in our database. The User, Session, and Token models all represent a table in the SQLite database. The fields in the model represent the fields each table will have. Prisma will provide us with a prisma object. This object will contain the model's object:
This objects will have methods like find(), findFirst(), update(), delete() that you can call on them to manipulate their tables.
We have learned all the folders, files, and schema models in a Blitz.js project, now we will learn how to use them to build an app.
Building todo app
We have scaffolded the todo Blitz.js project, make sure you are inside the project in your terminal. For ease of use, open the project in VS Code and click on the View tab on your VS Code and on Terminal to open VS Code's integrated terminal. So you can build and same time run commands on the project. Now, we start by defining our todo model.
Our todo model will have the fields:
The name field holds the name of the todo item, e.g "Wash clothes". We will define the todo model in our schema.prisma:
Now run the command blitz prisma migrate dev in your command.


It will prompt you for the name of the migration files to generate, type in added_todo and hit on the Enter key. Blitz.js will generate the following migrations:
We can now import db from the db/index.ts file. The todo model will be in the db object: db.todo. This db.todo will contain methods we can use to:
- Create new todos db.todo.create({data: {name: 'Go to church'}}).
- Edit todos db.todo.update(id, data).
- Get todo or todos: db.todo.find({}).
- Delete a todo db.todo.delete().
Now, we will create our pages for our todo app to do that we have to use the blitz generate command to generate pages, queries, and mutations files for our app.
Run the below command to generate our todo paraphernalia:

The g is an alias for generate, the all is a sub-command that tells the Blitz.js CLI the files to generate. The todo is the model we are generating files for.
For more info on the generate command visit this page: https://blitzjs.com/docs/cli-generate.
It will prompt you to run migrations for the todo model, type in n, and click Enter. We have had to cancel it because we have already added the Todo model in the schema.prisma file ourselves. If we hadn't done it we will then have to enter y to let Blitz.js run the migrations by itself.
The command generated the following folders and files:
- pages/todos
- pages/todos/index.tsx
- pages/todos/new.tsx
- pages/todos/[todoId].tsx
- pages/todos/[todoId]
- pages/todos/[todoId]/edit.tsx
- app/todos/components
- app/todos/components/TodoForm.tsx
- app/todos/mutations
- app/todos/mutations/createTodo.ts
- app/todos/mutations/deleteTodo.ts
- app/todos/mutations/updateTodo.ts
- app/todos/queries
- app/todos/queries/getTodo.ts
- app/todos/queries/getTodos.ts
Did you notice that Blitz.js has already generated all the files we will need in building this todo app? Let's look into them below:
pages/todos
This folder contains the page routes for the todo model.
pages/todos/index.tsx
This file contains a page component that renders when the URL path /todos is loaded in the browser. This component renders the list of todos in the database.
See the code Blitz.js generated:
See the TodoPage component, it is the component that is rendered when the URL path /todos is navigated. See that is exported as default. It uses the Suspense component to display a Loading... UI while the TodoList is being rendered. The TodoList component gets the todo list from the getTodos query resolver and renders the todo items using pagination. The items are displayed 100 items per page. There are Previous and Next buttons that enable us to navigate between pages in the todo list. In the TodosPage there is a Link that leads to the Create Todo page we will look into it below. We see two properties being set on the TodosPage function: authenticate and getLayout.
The authenticate property is used to set authentication for a page route. When the authenticate property is set to true, the user accessing the page route must be authenticated before the page can be loaded if not the login page will be reloaded.
What we have to understand is that Blitz.js gives us the code of each component it generates. The code does the half job for us, it is now up to us to either discard the Blitz.js code and write our own or just move on with the Blitz.js code.
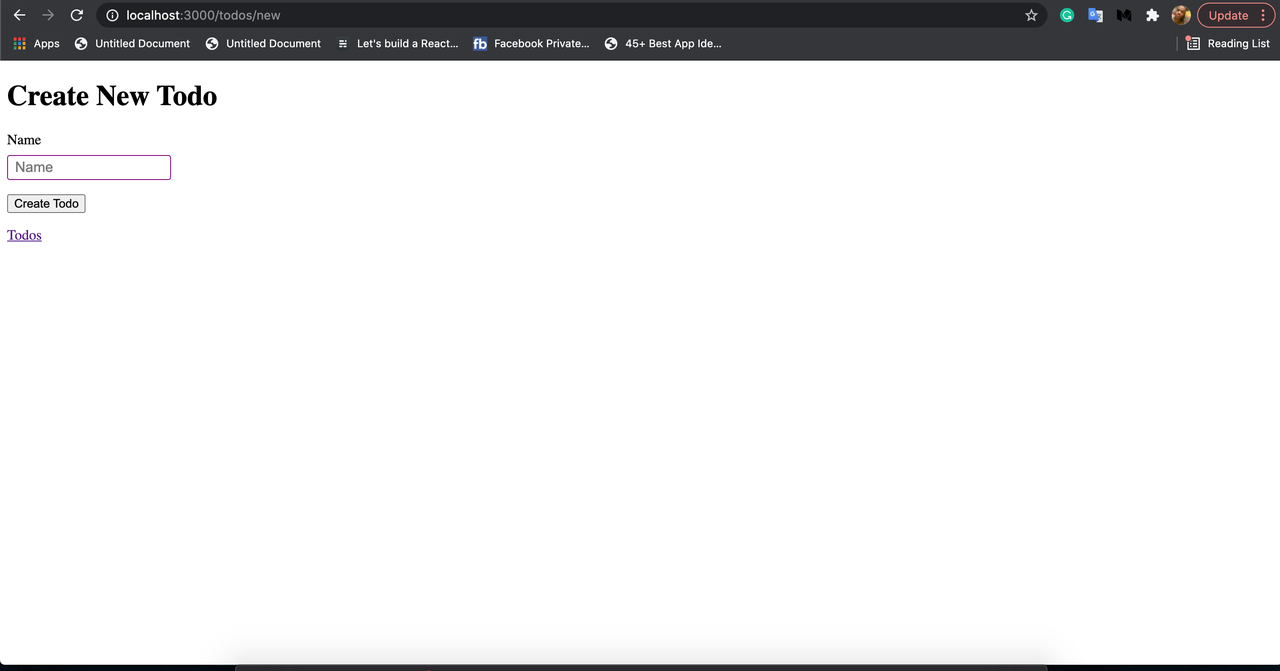
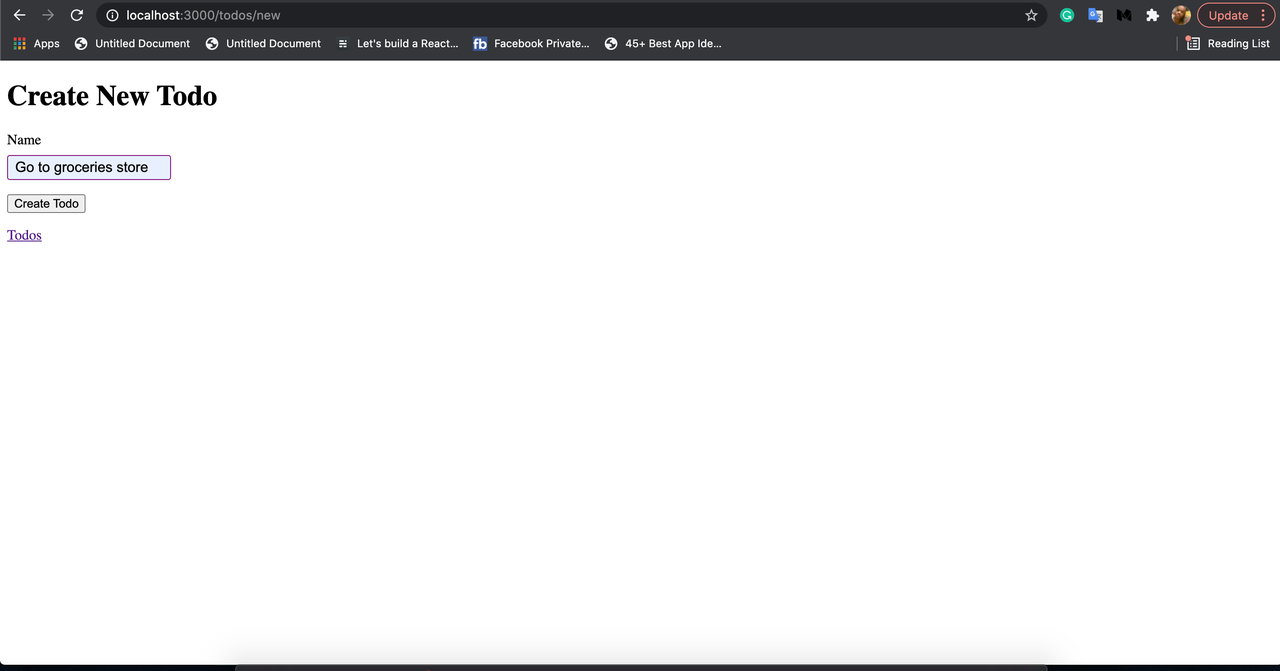
pages/todos/new.tsx
This page is rendered when the URL path /todos/new is navigated to. This page is where a new todo item is created.
Let’s see the code:
The TodoForm is rendered here with an input box and a Create Todo submit button. We type the todo text in the input box and clicking on the submit button to create the todo item. Looking at the onSubmit function prop, we see that createTodo mutation is called with the value in the input box, then after that, the route todos/[todoId] is loaded. We have a Todos link at the bottom that navigates us to the /todos page when clicked.
Let's look into the TodoForm component.
app/todos/components/TodoForm.tsx
This TodoForm component is a reusable component that renders an input box where the name of a todo item is to be typed.
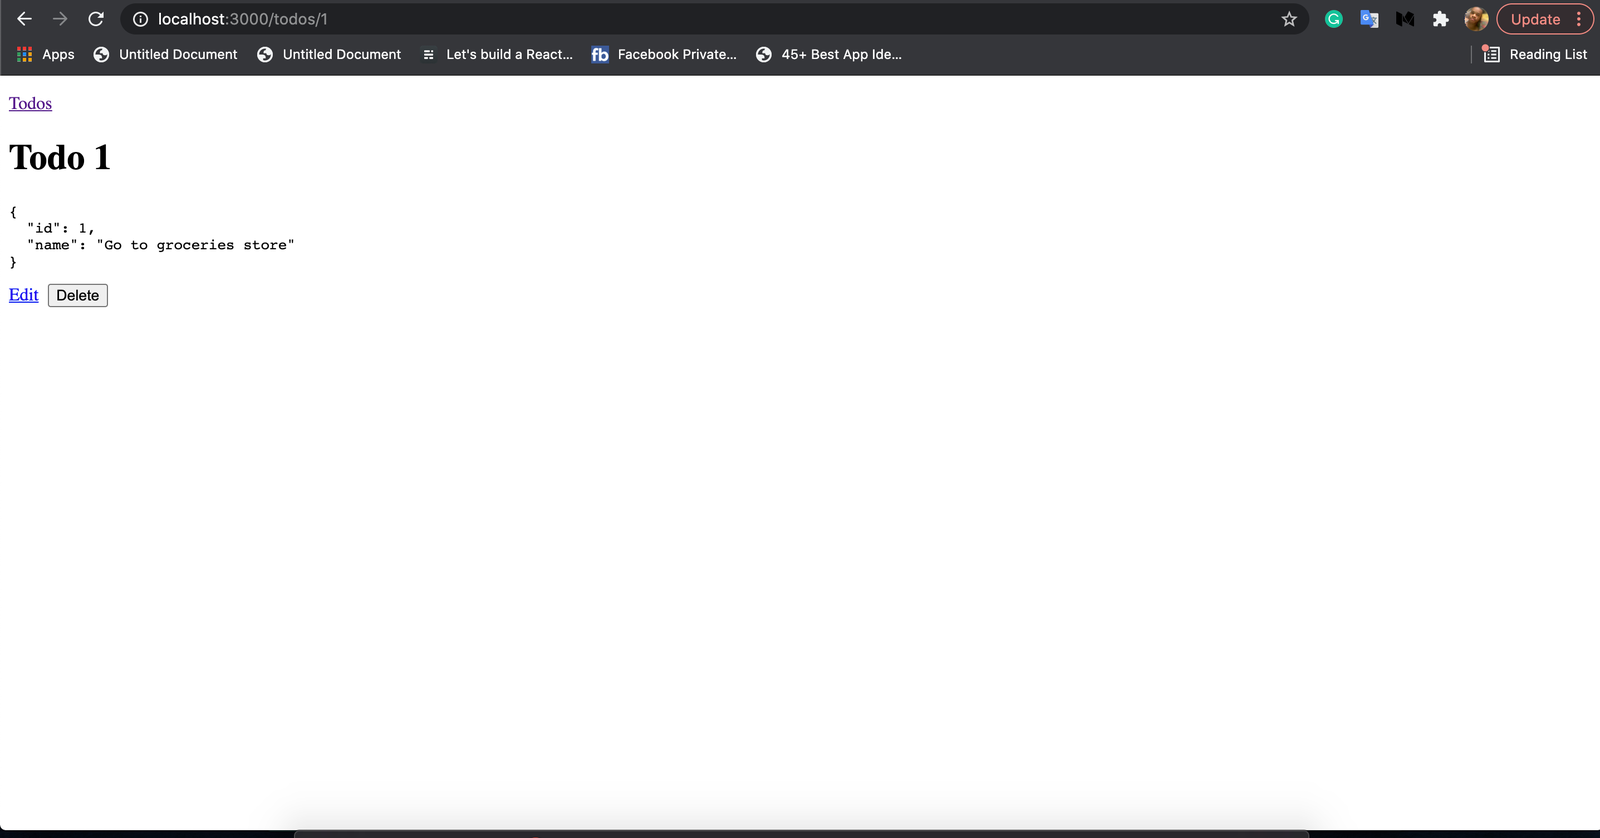
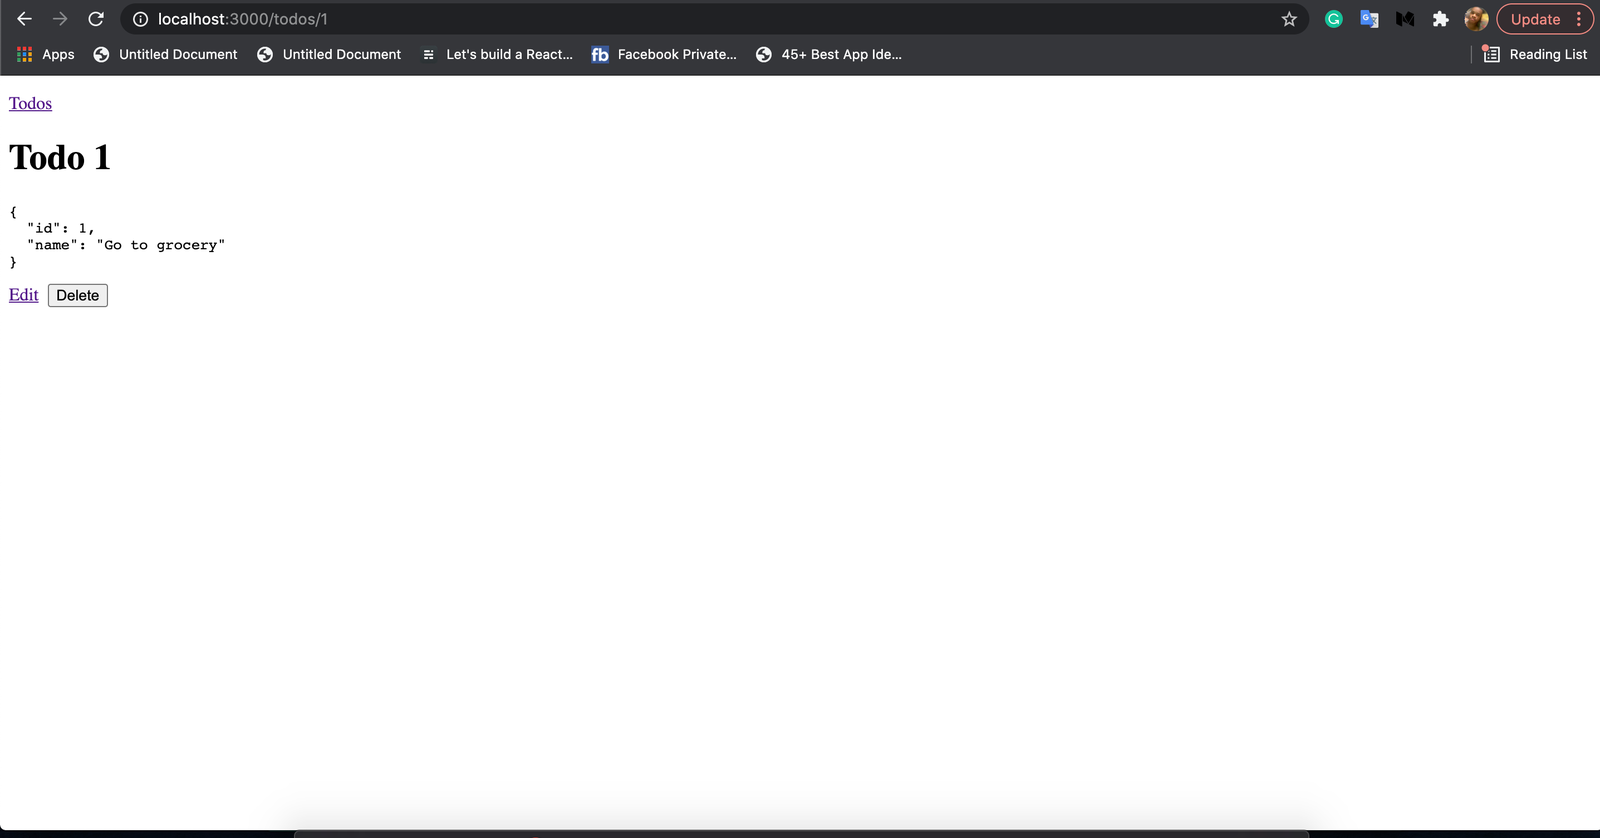
pages/todos/[todoId].tsx
The file is rendered when the URL path todos/[todoId] is loaded in the browser. It is a dynamic path in which the [todoId] is the unique id of the todo item we want to navigate to.
Let's see the code:
The ShowTodoPage component is the page component that is rendered when the route it represents is loaded. Inside the ShowTodoPage component, a Todo component is rendered in-between the Suspense component tags.
This Todo component displays the details of a todo item sent to it. It does this by retrieving the id from the params of the URL and calling a getTodo query, the result of this contains the todo details and it is used to display the todo item on the UI.
We have a Delete button that when clicked, pops out a confirm dialogue, if the "OK" button on the dialogue is pressed the todo item is deleted by calling a deleteTodo mutation, and the todos page is loaded.
pages/todos/[todoId]
This folder holds files that access and renders pages that work on a todo item. The [todoId] is the unique id of the todo item being processed.
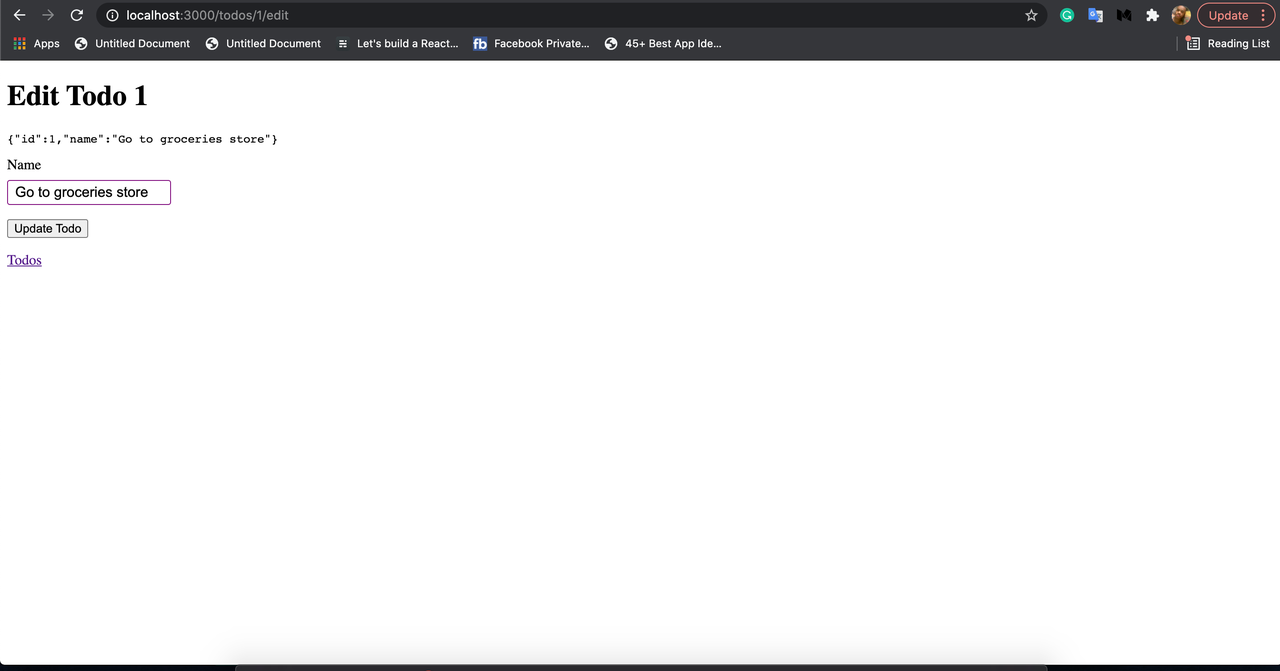
pages/todos/[todoId]/edit.tsx
This file is loaded when the dynamic route /todos/[todoId]/edit is loaded. This file is where a todo item detail is either updated or edited.
Let's see the code:
The EditTodoPage is the component that will be rendered when the dynamic route /todos/[todoId]/edit is navigated. An EditTodo is rendered in-between the Suspense component. There is a Todos link to the /todos page below. The EditTodo gets the id of the todo items from the URL params and uses it to fetch the todo details, these details are used to populate the TodoForm. The initialValues prop is used to set the initial values to the input box in the TodoForm. The onSubmit function is called when the Update Todo submit button is pressed. The function updates the todo item in the database by calling the updateTodo mutation with the values in the TodoForm, after that the /todos/[todoId] page is loaded to show the updated details. Now, we have analyzed the code generated in the todo pages. We will look into the mutation and query resolver generated for the todo model.
app/todos/mutations
This is the folder where mutation files for the todo model are kept.
app/todos/mutations/createTodo.ts
This file is a mutation file that exports a function that creates a new todo. This is called when an HTTP request is made to http://localhost:3000/api/todos/mutations/createTodo
Let’s see the code:
The function is authorized only for authenticated users. The input arg contains the todo details you want to create. Inside the function, we accessed the todo object from the db object, the db object is a Prisma client instance that contains the objects of the models defined in the schema.prisma file. The db.todo contains methods we can use to modify and access the todo table in the database.
Here, the db.todo.create method is called with the input parameter to create a new todo in the database. The newly created todo is returned to the caller.
app/todos/mutations/deleteTodo.ts
This is a mutation file that is called when the API http://localhost:3000/api/todos/mutations/deleteTodo is called via an HTTP request.
Let's see the code:
Similar to what we have in the createTodo mutation file above, this one calls the deleteMany method in the db.todo object to delete a todo based on the id passed in.
app/todos/mutations/updateTodo.ts
This file is also a mutation file that is called when the API http://localhost:3000/api/todos/mutations/updateTodo is called via HTTP.
Let's see the code:
Similar to other mutation files we have seen, this one updates a todo by call the updateTodo method in the db.todo object. The id of the todo item to update is passed and the data to update the todo with is also passed in.
app/todos/queries
This folder is where the query resolver files are kept for our todo model.
app/todos/queries/getTodo.ts
This is a query resolver file. It is called when the API endpoint http://localhost:3000/api/todos/queries/getTodo is called via an HTTP request. This query returns only a single todo item.
Let's see the code:
This code is similar to what we have in our mutation resolver files. The main code here is that it calls the findFirst method on the db.todo object to get the details based on the todo id passed to it. The where condition in its args is what it uses to get a todo details based on the unique id passed.
app/todos/queries/getTodos.ts
This file is a query resolver file that is called when the API http://localhost:3000/api/todos/queries/getTodos is called via an HTTP request.
Let's see the code:
The code returns the todos in the database. Blitz.js uses pagination to retrieve the todos list batch by batch. It returns an object that contains properties that the dev can use to know the next batch of todos to fetch.
- todos is the the current batch of todos
- nextPage is an object that contains properties with info on the next page to fetch.
- hasMore is a boolean that indicates whether there are mote todos to be fetched.
- count is the number of todo items fetched in a batch.
We are done, we can run the Blitz.js server blitz dev and navigate to localhost:3000/todos in our browser, from there we can add new todos, see the todos list, and edit and delete todo items.
Test Run
Create todo
View todo
Todo list

Edit todo

Conclusion
Blitz.js is a very powerful framework, its super-power is that it does half of the work for us.
In this tutorial, we started by learning what Blitz.js is, what goodies it brings to web development. Further down, we learned how to install the Blitz.js CLI, and how to scaffold a Blitz.js project. We learned how generated pages, models, mutation, and query resolvers using the Blitz.js generate command. We also, analyzed the files and folders in a Blitz.js project, we explained what each file does and the code Blitz.js generates inside them.