.png)


Practical overview of Padrino, a Sinatra-based Ruby web framework: install, project scaffolding, mountable apps, routing, views, forms, and admin tools.
Padrino is a Ruby web framework built on Sinatra, offering added features like mailers, caching, admin interfaces, and view helpers. It balances Sinatra's simplicity with the ability to handle more complex applications. Released in 2010, its latest version (0.16.0) supports Ruby 3.4 and Rack 3.0. Here’s a quick breakdown of what makes Padrino a go-to choice for developers:
- Flexibility: Choose your preferred ORM, testing framework, and renderer.
- Admin Interface: Includes authentication, permissions, scaffolding, and localization in 10 languages.
- Modular Design: Supports multiple sub-applications in a single project.
- Compatibility: Works well for those transitioning from Sinatra but not ready for Rails.
Key Highlights:
- Built for "graduated complexity", allowing easy scaling of projects.
- Requires Ruby 2.7.8+ and an HTTP server like Puma or Thin.
- Offers tools for routing, middleware, and modular architecture.
To get started, install Padrino with gem install padrino, scaffold a project, and customize it using its flexible options. Whether you're managing a simple app or a larger system, Padrino provides the tools to keep your development streamlined and efficient.
Getting Started with Padrino
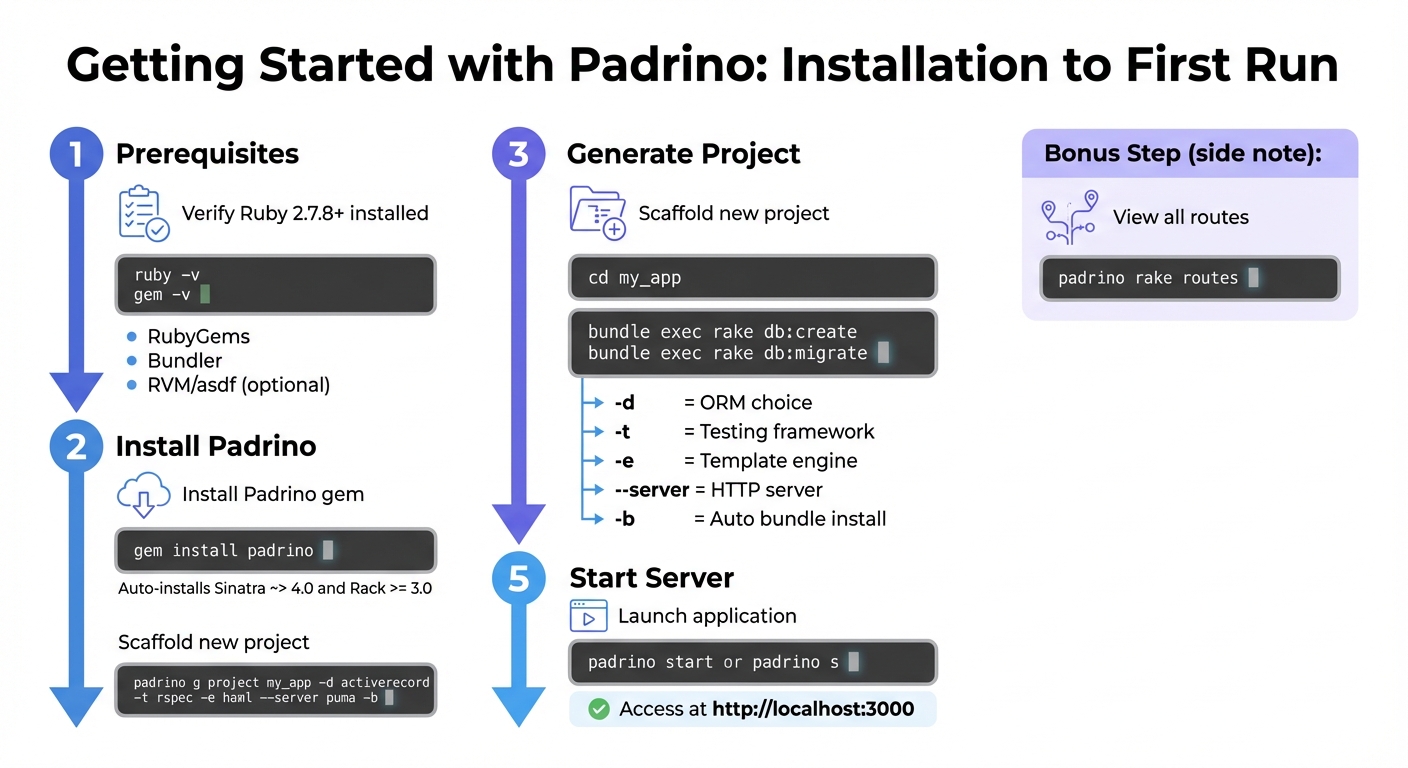
Padrino Framework Installation and Setup Process
Prerequisites
Before diving in, make sure you have Ruby 2.7.8 or a newer version installed. You can confirm your Ruby and gem versions by running:
ruby -v
gem -v
You'll also need RubyGems for managing packages and Bundler to handle project dependencies. If you're on Windows, the RubyInstaller is a great tool to set up your environment. To manage Ruby versions effectively, consider using tools like RVM or asdf.
Since Padrino builds on Sinatra, having a basic grasp of Sinatra's routing and its request/response cycle will be helpful. All Sinatra extensions integrate seamlessly with Padrino, so any existing knowledge will come in handy.
Once your environment is ready, you're all set to install Padrino.
Installing Padrino
To install Padrino, simply run:
gem install padrino
This will also install Sinatra ~> 4.0 and Rack >= 3.0 automatically. Keep in mind that Ruby 3.0 no longer includes WEBrick in its standard library. Because of this, you’ll need to add an HTTP server like puma, thin, or webrick to your Gemfile explicitly.
Creating Your First Project
After installing Padrino, you can scaffold a new project quickly. Use the following command to generate your project:
padrino g project your_project_name
During the setup, you'll be prompted to select options like your preferred ORM, testing framework, template engine, and HTTP server. For instance, if you want to use ActiveRecord, RSpec, Haml, and Puma, while also running bundle install automatically, you can use:
padrino g project my_app -d activerecord -t rspec -e haml --server puma -b
Once the project is created, navigate into the project directory:
cd my_app
To set up your database, run:
bundle exec rake db:create
bundle exec rake db:migrate
Then, start your application with:
padrino start
Alternatively, you can use the shorthand:
padrino s
By default, your app will run at http://localhost:3000. To see all your application's routes and controller mappings, execute:
padrino rake routes
One of Padrino's standout features is its auto-reloader, which detects file changes and refreshes the server automatically, making development faster and smoother.
sbb-itb-bfaad5b
Padrino's Architecture
Padrino uses a mountable architecture that allows you to integrate multiple sub-applications within one project directory. Essentially, your project serves as a container, while each sub-application - whether it's a web front-end, an admin panel, or an API - functions as a modular unit mounted within the project. This modularity is similar to how developers use specialized developer apps to manage different parts of their workflow. This setup makes it easier to manage and scale complex systems within a single codebase.
"Padrino has been principally structured and designed for mounting multiple applications at the same time." - Padrino Documentation
The framework initializes through config/boot.rb, which handles dependency loading, setup, and the all-important Padrino.load! command that boots the framework and activates all mounted applications. The config/apps.rb file is where you define how these applications are mounted using commands like Padrino.mount('app_name').to('/path'). You can map each application to specific URI namespaces or even different hosts.
Application Structure
Once your project is up and running, you'll see a well-organized directory structure. Key directories include:
app/: Houses controllers, views, and helpers for your application.models/: Contains shared data models.lib/: Used for custom modules and libraries.public/: Stores static assets like images, CSS, and JavaScript.
For projects with multiple applications, shared models can be stored in project/shared/models or the root models/ directory to ensure accessibility across all sub-applications. If you need to add a new module, you can use the command padrino g app <name>, which automatically updates the config/apps.rb file for you.
Routing Basics
Padrino's modular design extends to its routing system, which helps keep your application's logic clean and organized. Routes are grouped within controller blocks, making it easier to manage related functionality and create URLs. Named aliases (e.g., get :index) and namespacing (e.g., controllers :admin) allow you to automatically prefix URLs, while the url_for helper simplifies referencing routes throughout the app.
For more advanced routing, you can use the :with option to define named parameters, like get :show, with: :id, which makes parameters accessible via params[:id].
Padrino also supports route prioritization. High-priority routes are checked first, making them ideal for overrides, while low-priority routes are better for catch-all patterns. If you need custom URL structures, the map option lets you define them explicitly (e.g., get :index, map: '/custom/path').
Middleware and Configuration
Built on the Rack interface, Padrino connects Ruby web servers like Puma or Thin to your application. Middleware plays a vital role in handling system-level tasks. For example, Padrino::Reloader monitors application files and reloads them in development mode without requiring a server restart.
Configuration is managed through two main files:
app/app.rb: For application-specific settings.config/apps.rb: For project-wide mounting and configuration.
Since Padrino applications inherit from Padrino::Application (which itself extends Sinatra::Base), you can use Sinatra's configuration DSL with commands like set, enable, and disable. Environment-specific blocks in app.rb allow you to toggle features based on the environment. For example, you might enable template reloading or adjust logging levels with conditions like if Padrino.env == :production.
If you’re using non-standard directories, you can include them in the prerequisites list within Padrino.after_load in config/boot.rb. This ensures they are autoloaded and reloaded as needed.
Working with Views and Forms
After setting up your application's architecture and routing, Padrino equips you with helpful tools to simplify UI development. These include view helpers and form-handling features that reduce repetitive code and keep things organized.
View Helpers
Padrino's view helpers make it easy to create and manage HTML elements. For instance, the tag method generates self-closing tags, while content_tag wraps content in a specified HTML tag with attributes. For example:
content_tag(:div, 'Hello', class: 'greeting')
This produces a <div> element with the class "greeting" and the text "Hello."
Other helpers, like content_for and yield_content, are great for managing layout-specific content. You can use content_for :assets in a view to define unique styles or scripts, and then render them in the layout's <head> using yield_content :assets.
Need reusable templates? The partial helper has you covered. Instead of manually iterating through collections, you can use:
partial 'path/to/item', collection: @items
This keeps your code modular and easier to maintain.
Form Handling
Forms can be a hassle, but Padrino simplifies the process with tools like form_tag for basic forms and form_for for forms tied to specific models. The form_for helper uses the StandardFormBuilder to map model attributes to input fields and even display validation errors with error_messages_for.
If you're working with nested objects, fields_for allows you to manage related data in a single form. For example, when using form_for :user, submitted data is automatically mapped to params[:user]. Padrino also supports non-standard HTTP methods like PUT and DELETE by generating a hidden _method field to bypass browser limitations.
Want to customize your forms? You can create a custom form builder by inheriting from AbstractFormBuilder and configuring it as your application's default_builder. This ensures consistent styling and behavior across all forms.
Unobtrusive JavaScript
Padrino integrates unobtrusive JavaScript (UJS) to enable dynamic interactions without cluttering your HTML. Adding remote: true to form_for or link_to automatically includes a data-remote="true" attribute, triggering an XHR request instead of a full page reload. You can also use options like confirm: 'Message' to add confirmation dialogs or method: :delete to simulate HTTP verbs beyond GET and POST.
To use these features, include the necessary JavaScript libraries and UJS adapters in your layout:
= javascript_include_tag 'jquery', 'jquery-ujs'
For remote forms or links, ensure your URL helpers specify the JavaScript format, like url(:items, :create, format: :js). This makes sure your controller responds appropriately with JavaScript. And for actions that modify or delete data, always pair method: :delete with confirm: 'Are you sure?' to maintain RESTful API design best practices and prevent accidental changes.
Building Your First Padrino Application
Now that we've covered the basics of views and forms, let's dive into creating a practical blog application. This example will walk you through how Padrino's tools and conventions can simplify and speed up development, much like the Ruby on Rails framework.
Generating the Project
To get started, generate your blog project using this command:
padrino g project blog -d activerecord -t rspec -e haml -c scss -s jquery -b
Here’s what each option specifies:
- -d activerecord: Sets ActiveRecord as the ORM.
- -t rspec: Chooses RSpec for testing.
- -e haml: Uses Haml for templating.
- -c scss: Selects SCSS for stylesheets.
- -s jquery: Includes jQuery for JavaScript.
- -b: Automatically runs
bundle installafter generating the project.
After running the command, move into your project directory:
cd blog
If your app needs a database, configure the connection details in config/database.rb. For SQLite, you can include the -a sqlite flag during project generation. Then, set up the database schema by running:
padrino rake sq:migrate
Next, create a Post model with fields using this command:
padrino g model Post title:string body:text published_at:datetime
This will generate the model and its corresponding migration. Run the migration immediately to keep the database schema updated. Afterward, set up an admin interface by running:
padrino g admin
Initialize the admin account with these commands:
rake db:create
rake db:migrate
rake db:seed
With the basic setup complete, it's time to build the application's views.
Adding Views and Templates
In Padrino, views are stored in the app/views directory and are grouped by controller name. Since we specified Haml (-e haml), template files will use the .haml extension. Start by creating a layout file at app/views/layouts/application.haml. Use a yield statement in this file to mark where the view content should be inserted.
For the blog's index page, create a template at app/views/posts/index.haml. To keep your code modular and clean, use the partial helper. For instance:
= partial 'posts/post', collection: @posts
This will render the _post.haml partial for each post in the @posts collection. You can also include navigation links with the link_to helper and manage assets using stylesheet_link_tag or javascript_include_tag.
Padrino automatically determines the correct template based on the rendering engine and locale. For example, calling render 'posts/index' will find the right file without needing to specify the extension. If you want to disable layouts for specific routes, add layout: false to your render call.
With your views ready, the next step is to implement CRUD functionality.
Implementing CRUD Functionality
Padrino’s modular design makes CRUD operations straightforward. The admin generator simplifies creating, reading, updating, and deleting records. To set up CRUD for posts, run:
padrino g admin_page Post
This command generates controllers and views for managing posts. As the Padrino documentation explains:
"Padrino Admin makes it easy to create, edit and delete records automatically."
For the public-facing site, generate a controller with:
padrino g controller posts index show
Define routes using named symbols like get :index or get :show, with: :id to handle specific actions. Instead of hardcoding paths, use helpers such as url_for or url for referencing routes.
In your controller actions, fetch data from the model and assign it to instance variables. For example:
-
In the
indexaction:@posts = Post.all -
In the
showaction:@post = Post.find(params[:id])
You can view your app’s routes anytime by running:
padrino rake routes
This will display the URL mappings to controller actions. To see your application in action, start the server with:
padrino s
Then, open your browser and visit http://localhost:3000. Padrino’s built-in reloader will apply any code changes without needing to restart the server.
Conclusion
Key Features Recap
Padrino blends the simplicity of Sinatra with tools designed to handle more complex applications. As the Padrino Development Team explains, "Our goal with Padrino is to stay true to the core principles of Sinatra including a focus on simplicity and modularity". This framework takes an agnostic approach, giving you the freedom to select your preferred tools, whether it's an ORM (like ActiveRecord, Sequel, or Mongoid), a testing framework (such as RSpec, Minitest, or Cucumber), or a rendering engine (Haml, Slim, or Erb). You're not tied to rigid defaults.
One standout feature is its mountable architecture, which makes it easier to manage large projects. For instance, you can divide your application into smaller, focused sub-applications - like separating an admin panel, public-facing site, and API into distinct components. Additionally, the built-in admin interface simplifies tasks like authentication, permissions, and model scaffolding, all without requiring extra setup.
Padrino is also up-to-date with support for Ruby 3.4, Sinatra 4.0, and Rack 3.0, ensuring your projects run on modern, secure platforms. Its gradual complexity model allows you to start small and scale up, adding features as your application grows - offering flexibility for any development pace.
These features provide a solid starting point for diving deeper into Padrino.
Next Steps
To build on these foundational features, start with the official Blog Tutorial. It offers a step-by-step guide, complete with screencasts, to help you understand the full-stack workflow. Next, explore the Generators guide to learn how to automate project setup and customize components. Practice organizing modular projects by studying how to mount sub-applications, which is key for building scalable, multi-app systems.
Since Padrino is built on Sinatra, reviewing the Sinatra Book and its GitHub repository will deepen your understanding of the core DSL. For advanced learning, consider topics like asynchronous concurrency, integrating Grape for API development, or running Padrino on JRuby. Lastly, stay connected with the Padrino community through their official Twitter, Gitter chat, or the #padrino IRC channel on Freenode for live discussions and updates.
FAQs
When should I use Padrino instead of plain Sinatra?
If you're working on a project that demands more structure and built-in tools for handling complex web applications, Padrino might be the better choice. While it builds on Sinatra's simplicity, Padrino enhances it with features that make managing larger, more intricate projects much easier.
Some of the standout tools Padrino offers include:
- Admin interface: Simplifies managing your application’s backend.
- Mailer: Streamlines email handling within your app.
- Caching: Boosts performance by efficiently storing and retrieving data.
- Localization: Essential for projects that need multi-language support.
- Application mounting: Allows you to organize and manage multiple apps within a single project.
Padrino is perfect for developers who love Sinatra’s lightweight nature but need more functionality and organization to tackle feature-packed applications.
How do I mount multiple sub-apps in one Padrino project?
To include multiple sub-apps in a Padrino project, you can use the mount method within your main application. Here's a quick example:
Padrino.mount('SubApp1').to('/subapp1')
Padrino.mount('SubApp2').to('/subapp2')
Each sub-app should be set up as an independent Padrino application. The main app will handle routing by directing requests to the appropriate sub-app based on the URL prefix defined in the to() method.
Why do I need to add Puma, Thin, or WEBrick manually?
When using Padrino, you’ll need to manually add a web server like Puma, Thin, or WEBrick to your application. These servers aren’t bundled by default, so it’s up to you to install and configure one to ensure your app runs as expected.